A Video Editor Minus the Subscription.
jumpcut.GG is a full video editor: auto-transcribe, clip straight from the words, build your cut, layer captions and graphics, and export to any aspect ratio. All on your own machine. Buy once, no accounts, nothing leaves your PC.
A project is made of four things, and every panel in the window edits one of them.
- Footage is the video you import. Each one gets a word-level transcript.
- Clips are ranges of footage, cut from the transcript's words or at the playhead.
- The sequence is clips in order, played as one piece.
- The composition is the video you render: a canvas and a timeline of layers. A layer is a clip, a text, an image, a shape, a caption or a sound.
You can stop at any stage. A selection of words can be exported as a video in two clicks; the sequence and the composition are there when you want more control. A project can also start with no footage at all and hold only text, images, shapes and sound.
The start page
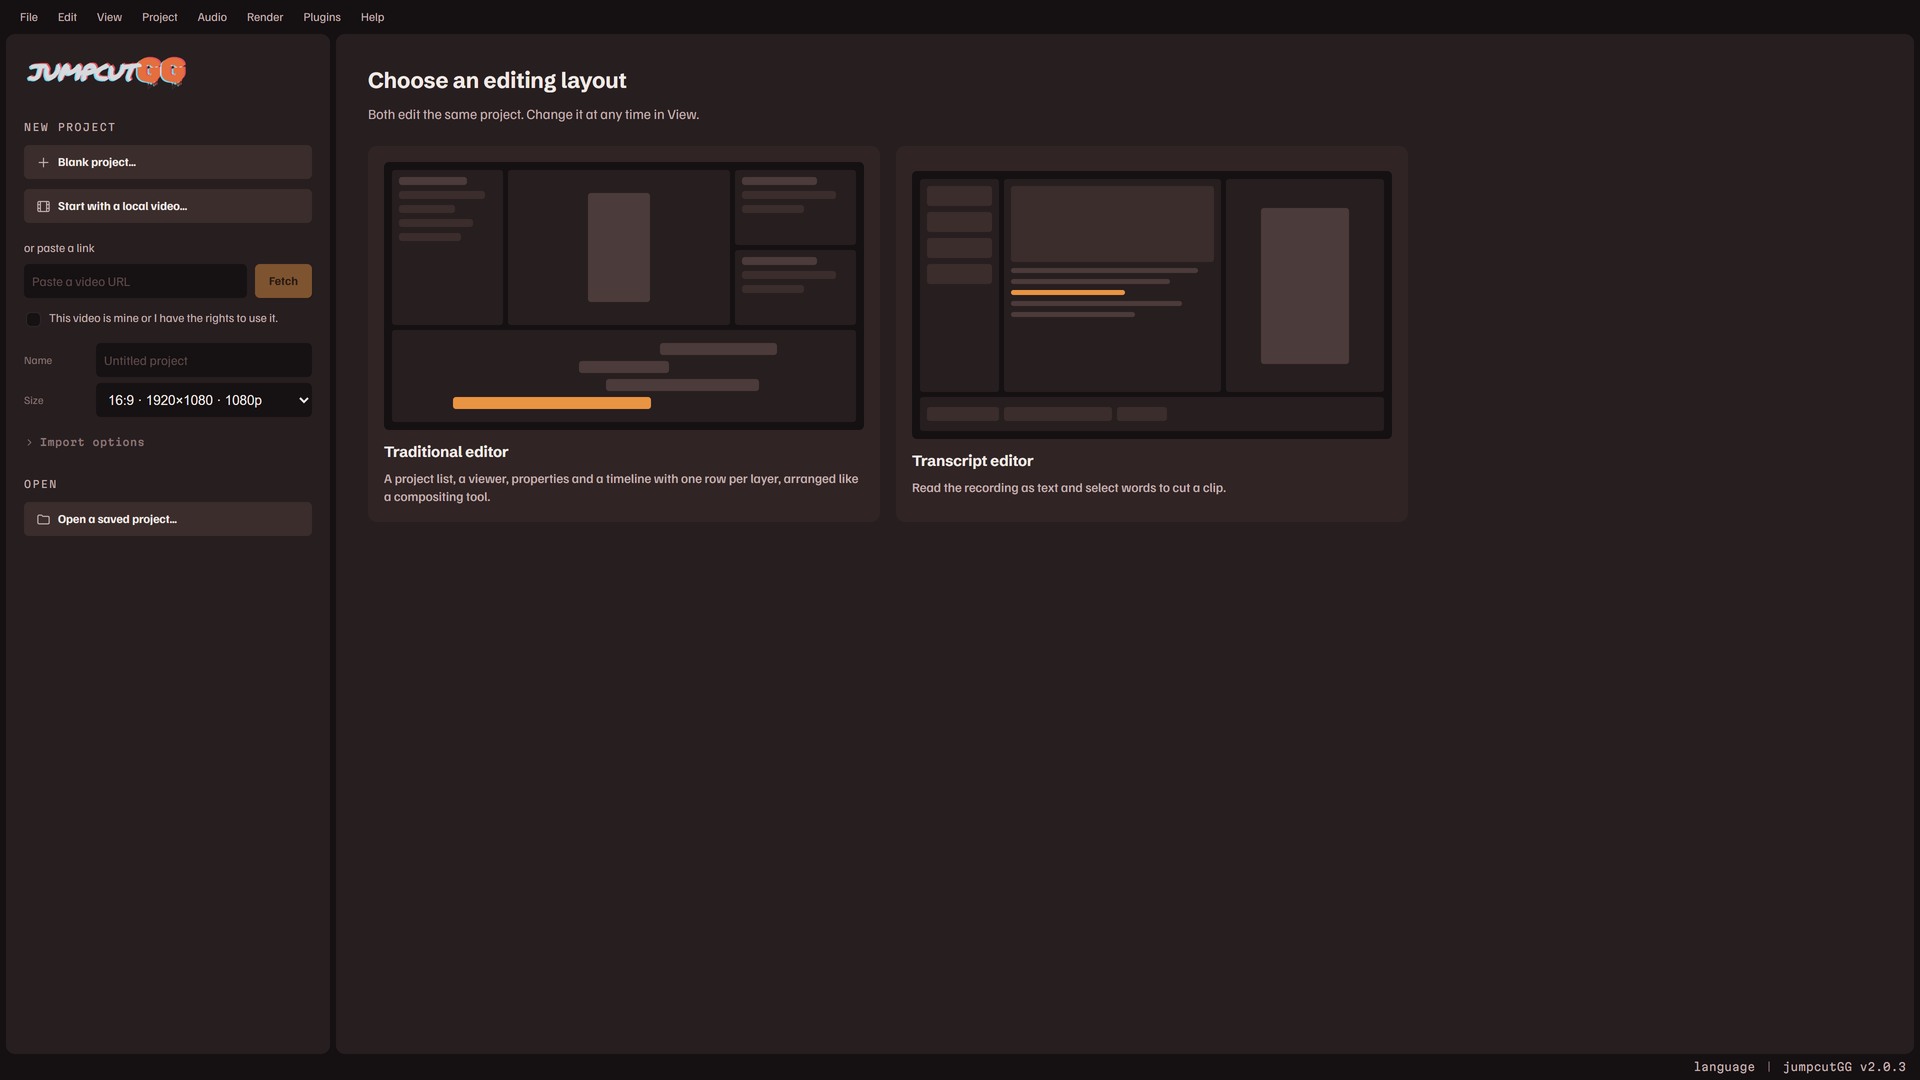
The app opens on the start page. The column on the left starts or opens a project.
- Blank project… makes a project with no footage in it. It asks for a name and a size, opens in the Traditional layout and is written as a project file at once.
- Start with a local video… picks a video file. A file dropped on the window does the same.
- To fetch a video from a link, paste it, tick This video is mine or I have the rights to use it., and press Fetch. The tick is asked for again before each fetch.
- Import options holds what applies to an import. See Importing footage.
- Open a saved project… opens a project file. A project file dropped on the window opens too.
- Resume project appears at launch when the last session left work that was not saved to a file.
The rest of the page is what you have already made.
- Recent projects are the project files you saved, as cards or as a list. Click one to open it. The ✕ on one hides it from the list; the file is kept, and opening it again puts it back.
- Recent imports are videos the app has already fetched and transcribed. Use opens one as a new project without fetching it again, Re-transcribe runs the transcription again with the current settings, and Clear deletes its cached files. A saved project that used a cleared import offers to import it again when it is opened.
The first time it runs, the page asks which layout you want to edit in: Transcript editor or Traditional editor. Both edit the same project, and the choice can be changed at any time. See The window and its layouts.
Your first video, in about five minutes
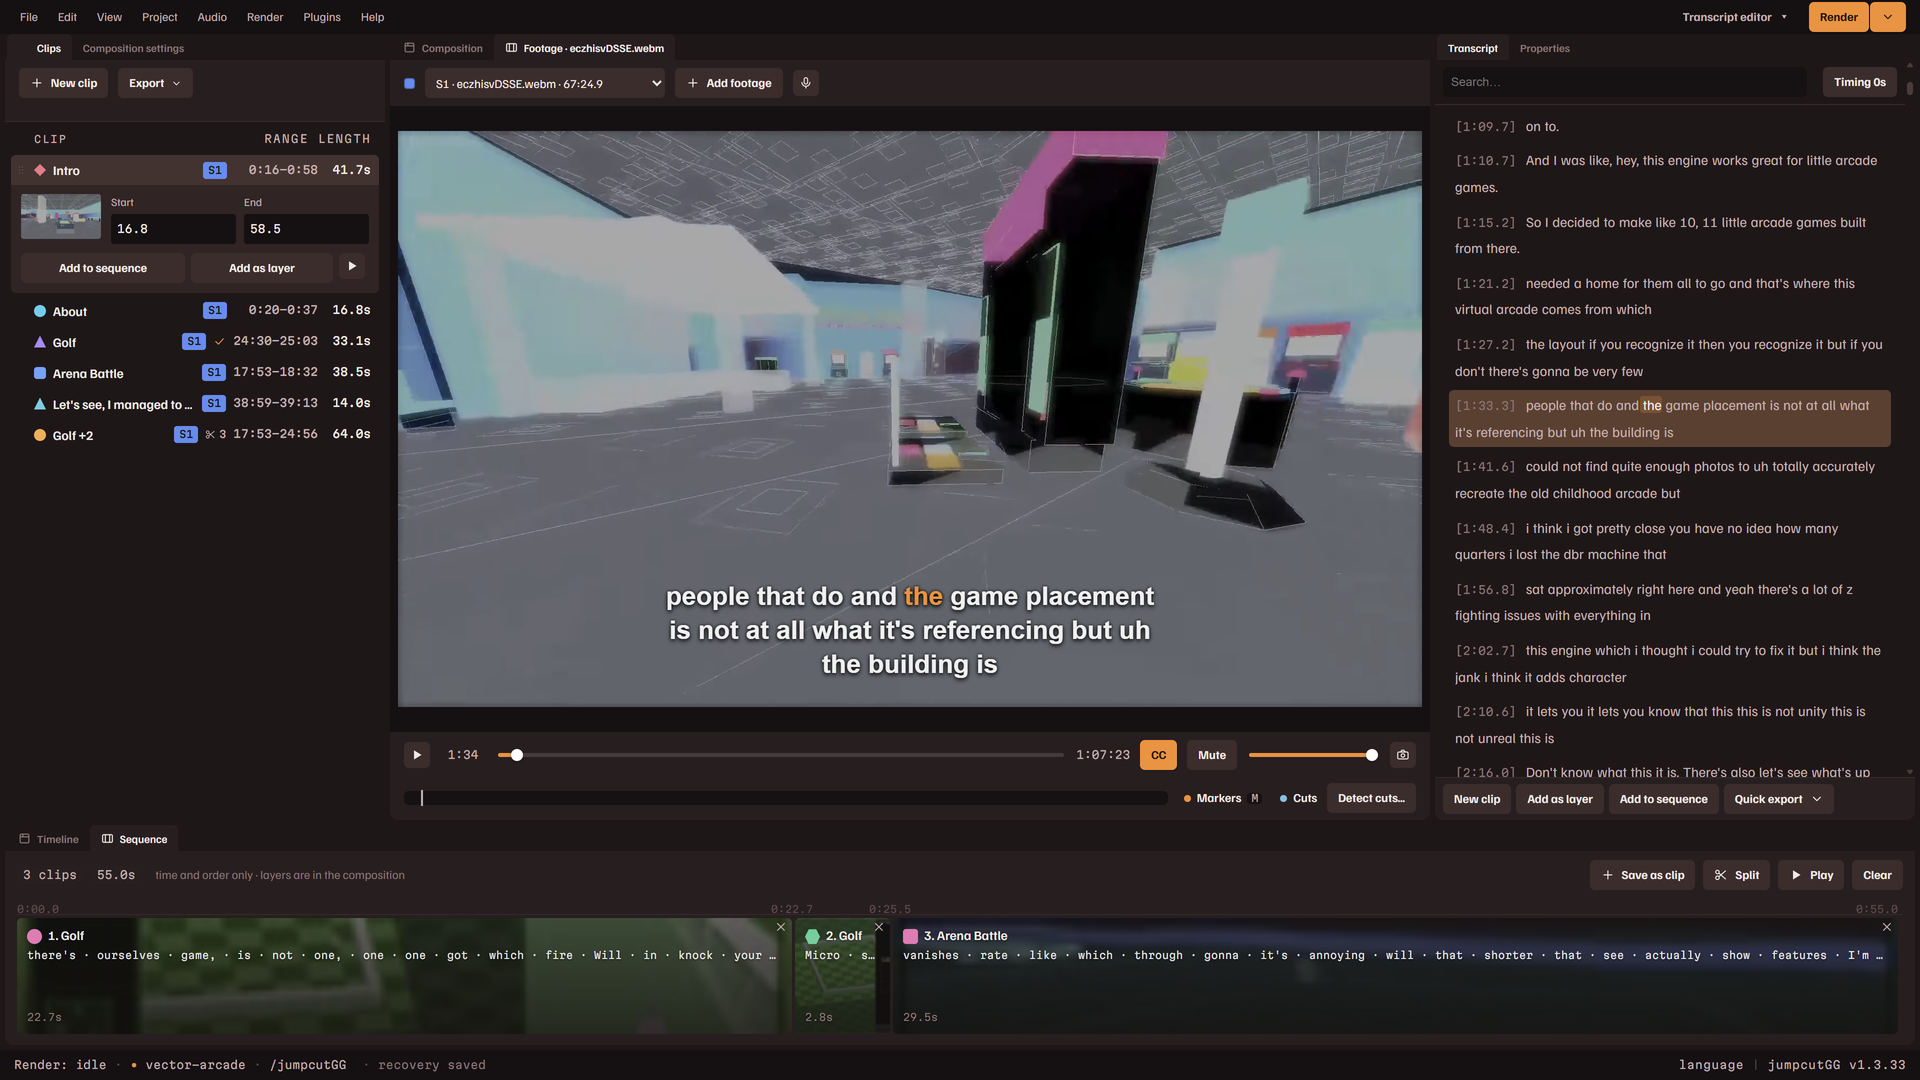
- Pick Start with a local video…, or paste a link, on the start page. A local file fills the card with its length, size and format; press Import.
- Wait for the transcript. The import screen names each stage and how far along it is. When it finishes, the transcript opens with every word clickable; clicking one jumps the player to that word.
- Play through or search the transcript, then drag across the words you want.
- Right-click the selection. New clip from selection keeps it as a clip; the rows under Quick export render it now, as it is or cropped to a shape; Export with template renders it through a saved design with captions and titles in place.
- The file is written to your output folder. Exports, in the View menu, lists it and plays it.
Importing footage
Footage comes in from the start page, or into an open project from Add footage… in the Project menu, Add footage on the Footage panel, or a video file dropped on the window. Footage added to an open project joins it: your clips, sequence and composition stay as they are. Video files can be mp4, mkv, webm, mov, avi, m4v or ts.
A local file
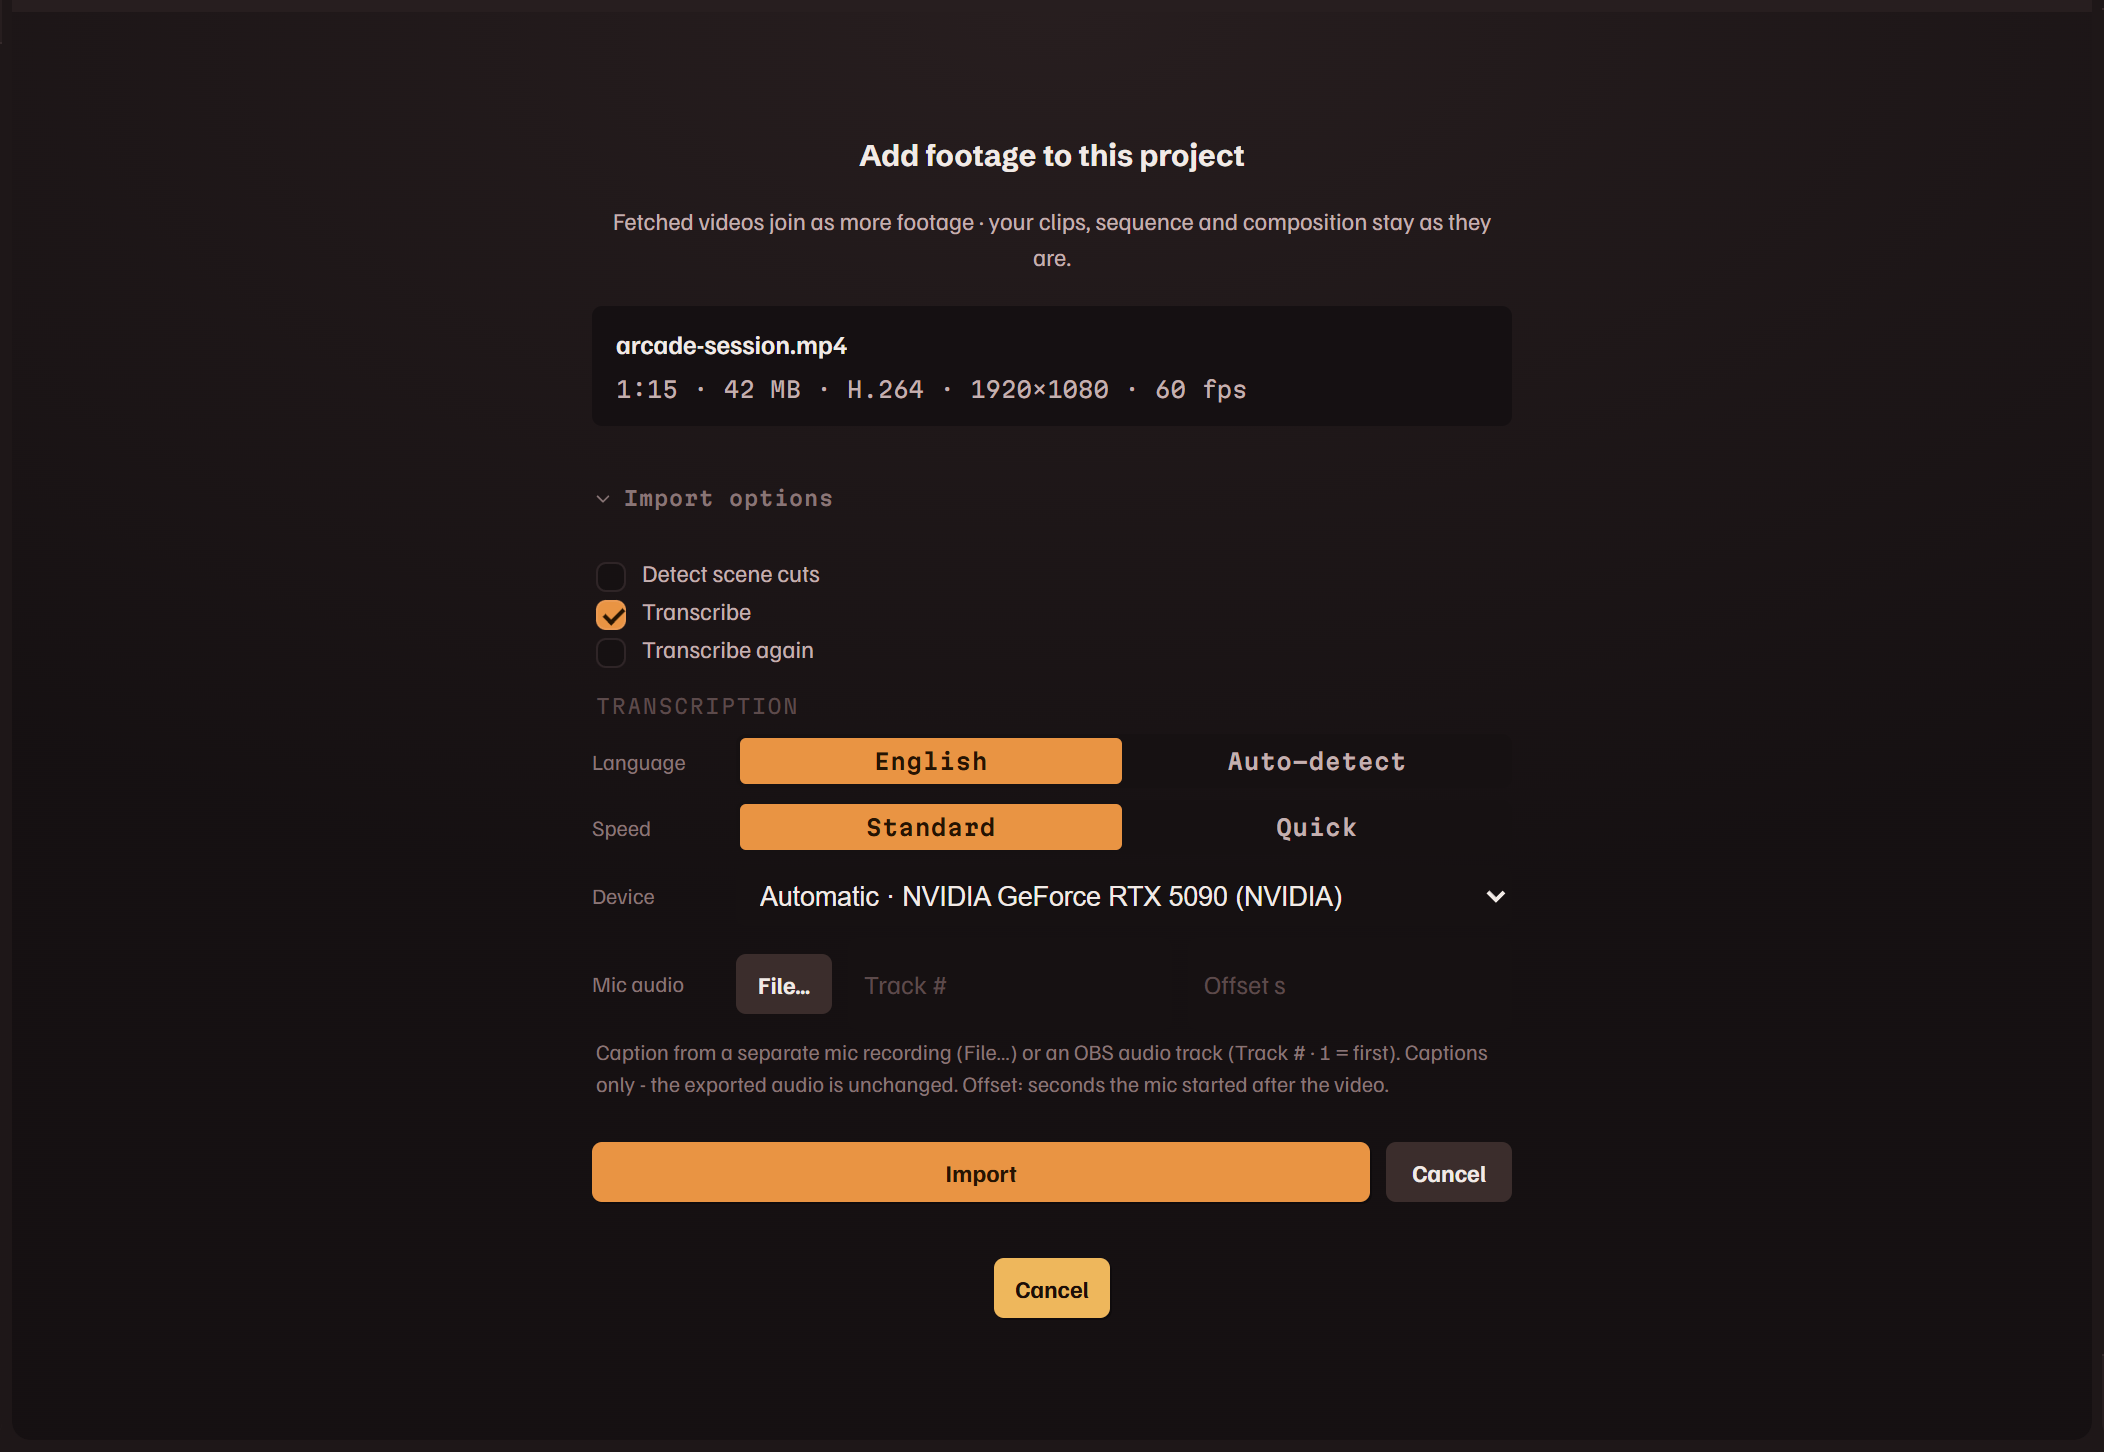
A file you pick or drop is not imported at once. It fills the card with its name, length, size, codec, resolution and frame rate, and a note when something about it matters: that it has no sound, for one. Import or Enter starts the import; Cancel or Esc clears the card.
Import options
- Transcribe makes the transcript, which captions and cutting clips by text use. It is ticked for every import; untick it for footage where the words do not matter.
- Re-fetch (ignore the cached copy) downloads a link again when the app already has it.
- Transcribe again replaces a transcript the app already has.
- Language is English or Auto-detect. It is remembered for later imports.
- Speed is Standard or Quick. Quick transcribes faster with lower accuracy, for older PCs.
- Device is GPU or CPU. On a machine with more than one graphics adapter it is a list of them: Automatic picks the card with its own memory, and a laptop's built-in graphics can be several times slower.
- Mic audio captions from a separate microphone recording (File…), or from one audio track of a multi-track recording (the track's number, 1 being the first). The offset is the number of seconds the microphone recording started after the video. This changes what is transcribed only; the exported sound is the video's own.
Preview copies
The viewer cannot show every format. For AV1 and HEVC recordings the card tries the file first. If the viewer cannot play it, the import makes a preview copy: a smaller file the app plays while you edit. If it can, the card says how long a jump in the file took and offers Make a preview copy, ticked. A copy takes a few minutes to make and is quicker to move around in. Exports always read the original.
Make preview copy in the Project menu makes one later for footage that has none. Where copies are kept, and clearing them, is in Settings.
The import screen
An import shows its stage, the time it has taken and a bar: fetching, extracting audio, transcribing, making a preview copy. Cancel import stops it. Imports run one at a time, and a second one waits in the Import queue. If an import fails, the screen shows the error with Back and Copy error report, and Update downloader when the site refused the download.
A blank project
Blank project… asks for a Name and a Size, and Create opens an empty composition. Text, images, shapes and sound need no footage. The Footage and Transcript panels say No footage yet and offer Add footage…; the first footage you add makes it an ordinary project.
Changing what is transcribed
Transcription audio… in the Audio menu, or the microphone button on the Footage panel, transcribes the footage in the viewer again from a different source: one audio track of the video (The video's own audio), or A separate mic / commentary recording with its offset in seconds. Re-transcribe runs it. Footage imported without a transcript shows Transcribe… in the Transcript panel, which opens the same dialog.
The window and its layouts
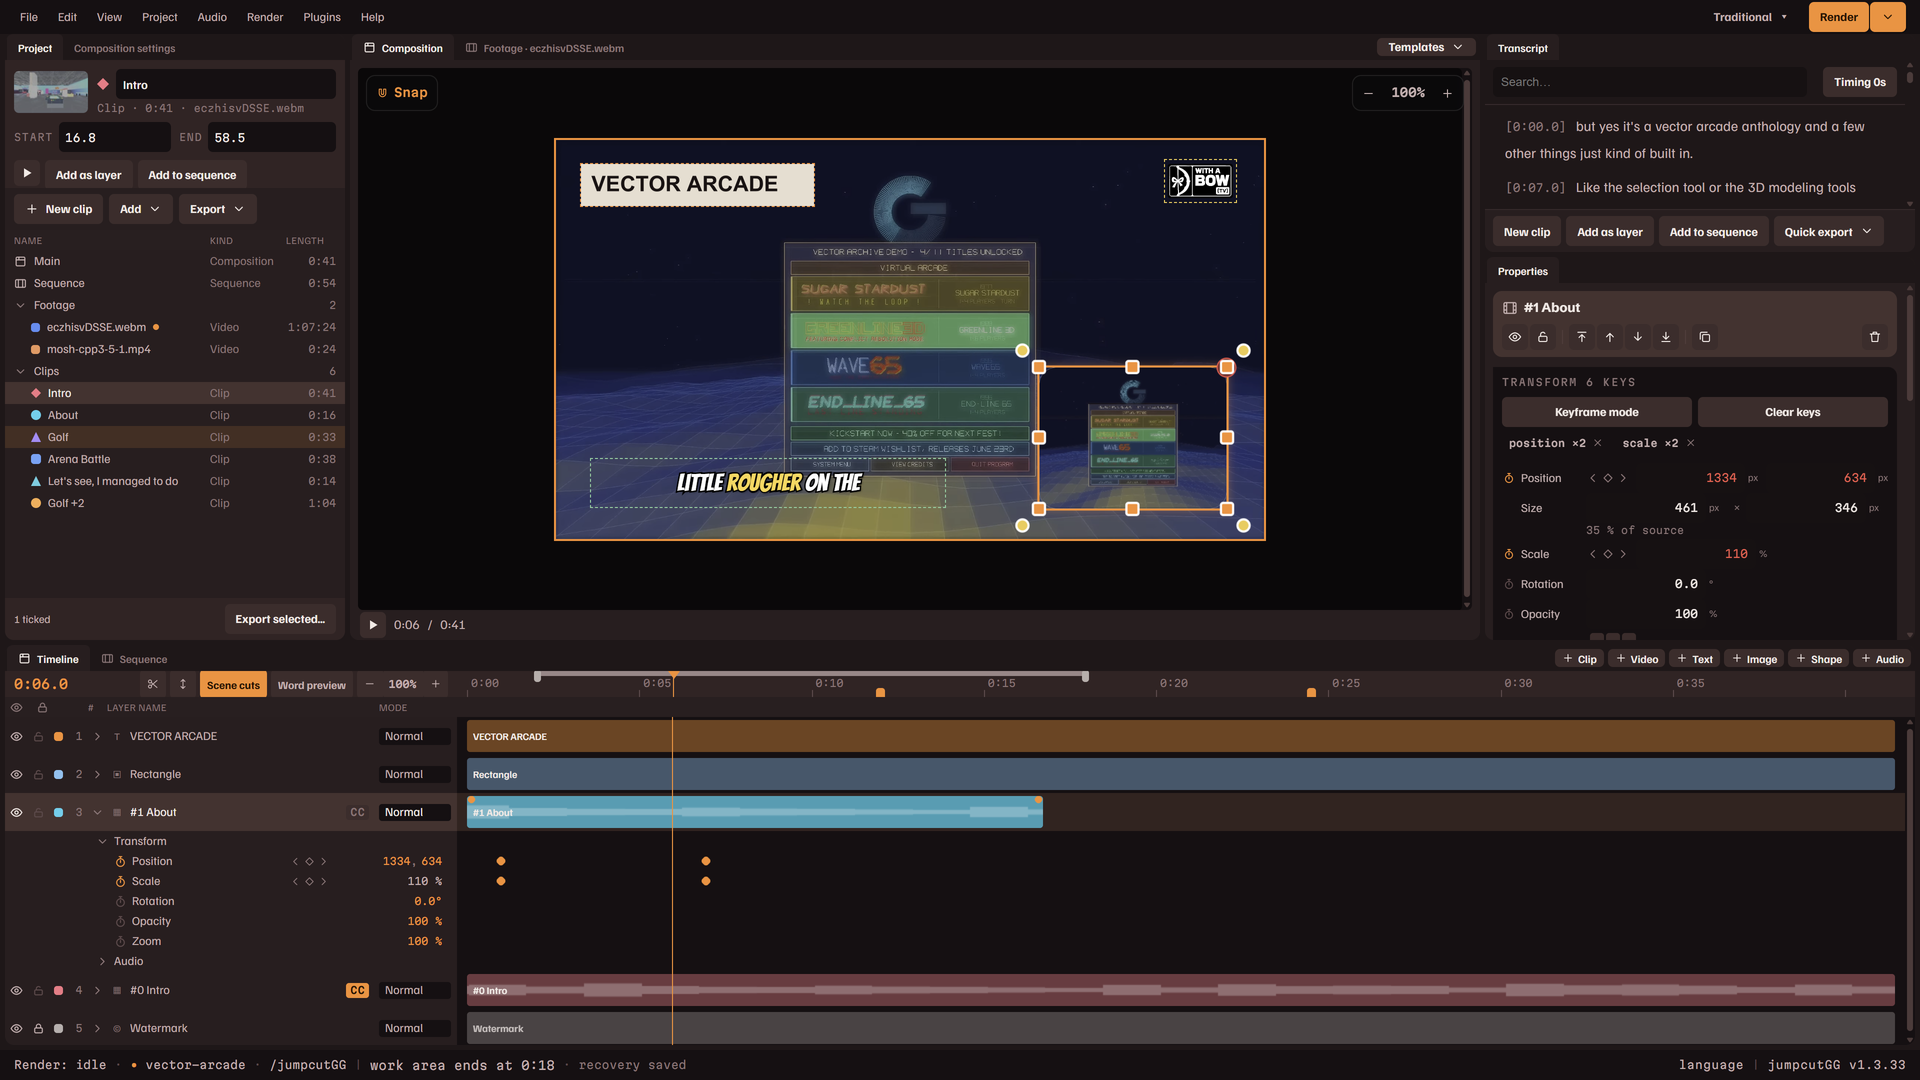
The menu bar runs along the top, with the layout button and Render at its right end. The status bar runs along the bottom. Between them the window is five docks: one on the left, the viewer in the middle, two stacked on the right, and one along the bottom. Every panel is a tab in one of them.
Layouts
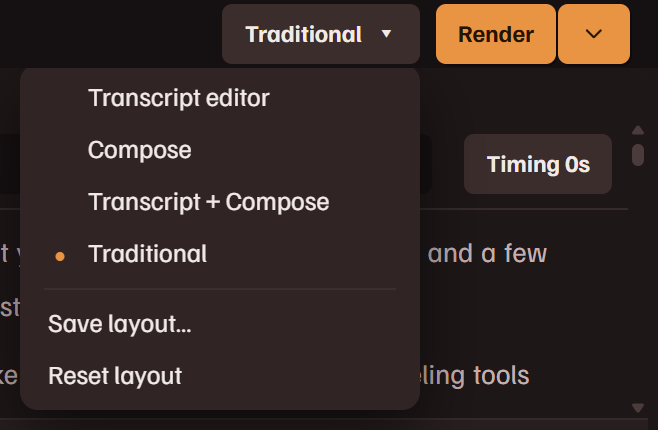
A layout is an arrangement of the panels. Four ship with the app, listed by the layout button and under Panel layout in the View menu. A project opens the same in every layout.
| Transcript editor | The footage player with the transcript beside it, Clips on the left and the Sequence along the bottom. For reading a recording and cutting clips from its words. |
| Compose | The same docks with the composition forward: Composition settings, the canvas, Properties and the Timeline. |
| Transcript + Compose | The canvas in the middle, with the footage player and the transcript stacked on the right. |
| Traditional | The arrangement of a compositing tool: the Project list on the left, the viewer, the transcript over Properties on the right, and the Timeline with one row per layer. It has keys of its own. |
Arranging the panels
- Click a tab to bring its panel forward.
- Drag a tab onto another dock to move its panel there. Esc cancels the drag. A dock with no panels in it is not shown.
- Right-click a tab and pick Close panel, or click it with the middle button, to close a panel. Panels in the View menu lists every panel, ticked while open, and opens a closed one. A command that needs a closed panel opens it.
- Drag the divider between two docks to resize them.
- Save layout… saves the arrangement under a name, and it then appears in the list with the four that ship. Delete a saved layout removes one. Reset layout puts the layout in use back the way it shipped or was saved.
The arrangement is remembered on this machine, not in the project. The three transcript layouts keep Project closed and list clips in Clips; Traditional does the reverse. When a panel is too narrow for its buttons, the ones that do not fit move into a More actions button.
The status bar
From the left: the render state (click it for Exports), the open project's name with a dot in front when it has unsaved changes, the output folder (click it to open the folder), the last message, and the recovery copy's state. On the right: a hint for whatever is under the pointer, language, which opens Settings, and the version, which opens About. The window's title names the open project the same way.
Footage
The Footage panel plays the imported video itself. A project can hold several footages; the list at the top of the panel picks which one the player and the transcript show, and the colour swatch beside it gives that footage a new colour, which marks its clips everywhere.
- The transport row has play / pause, the time, a seek bar, CC, Mute, the volume, and a camera button that saves the frame on screen as a full-resolution PNG in your output folder.
- CC shows the spoken line over the video with the current word lit. It is how you check word timing.
- The marker bar under the transport shows your markers and the scene cuts the import found. Press or drag on it to scrub. Click a tick to go to it; double-click one to make a fifteen-second clip around it.
- The clip selected in Clips or Project is a band on the marker bar in the clip's own colour. Drag an end of the band to move the clip's start or end, or its middle to move the whole clip; an end catches on cuts and markers. I and O set the selected clip's start and end at the playhead, and with no clip selected they make one. Shift I and Shift O go to its start and end.
- Drag on the marker bar with Shift held to make a clip of that stretch, named from the words said in it; both ends catch on cuts and markers. New clip beside the bar makes one at the playhead. While an end of a band is dragged, the footage shows the frame it is on.
- Detect cuts… scans the footage for scene cuts again, with a sensitivity and a minimum gap between cuts of your choice, and replaces the cuts it found before. The status bar says when the cuts are in.
- M drops a marker at the playhead while the footage is playing or paused. The Markers and Cuts switches show or hide each kind.
- , and . jump to the previous and next cut. The button between the two arrows on the bar switches them to step through markers instead.
- With no layer selected, ← and → step one frame, and one second with Shift.
Transcript
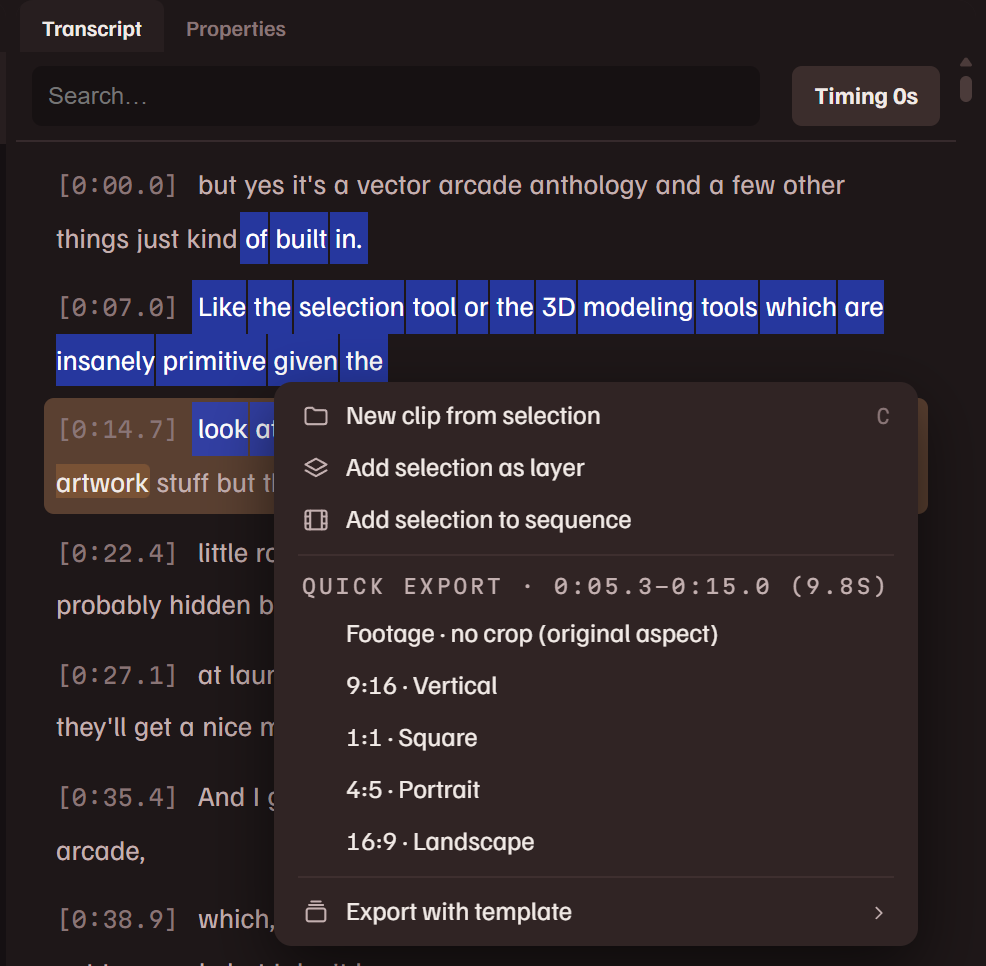
The transcript is the footage as text. Each line starts with its time; click a time or a word to jump there. While the footage plays, the spoken word is highlighted and kept in view.
- Search. Type in the search field, or press Ctrl F from anywhere, to show only the lines that contain the text. Esc in the field clears it.
- Select. Drag across words. The selection is what the buttons under the transcript and the right-click menu act on.
- Correct a word. Double-click it and type. Enter keeps the change and captions use it.
- Timing. The Timing button shifts every word of this footage earlier or later. See Word timing.
The strip under the words, and the right-click menu on a selection, hold the same commands.
| New clip | A clip of the selected words, or of fifteen seconds at the playhead when nothing is selected. C does the same. |
| Add as layer | The selected words as a clip and as a layer in the composition, at the playhead. |
| Add to sequence | The selected words as a clip at the end of the sequence. |
| Quick export | Renders the selected words as a video of their own: at the footage's own shape, or centre-cropped to 9:16, 1:1, 4:5 or 16:9. These have no captions or titles. |
| Export with template | Renders the selection through a template. Listed when at least one template exists. |
Selected words can also be dragged onto the Timeline, where they become a layer at the spot you drop them, or onto the canvas.
Clips
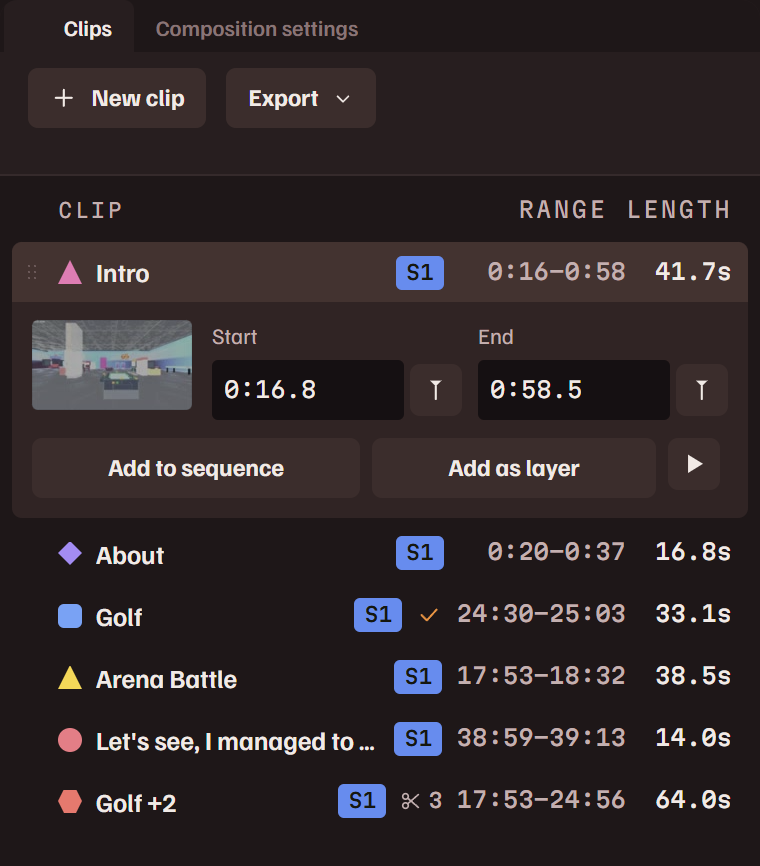
A clip is a named range of one footage. The panel lists them with their range and length. Click a row to open it: its thumbnail, Start and End as times (type 1:05.5 or 65.5, or drag the value), each with a button that sets it at the Footage playhead, Add to sequence, Add as layer, and a play button that previews it in the Footage viewer. Click the name to rename it. The open clip is also a band on the Footage viewer's marker bar, where its ends drag.
- New clip makes a clip from the words selected in the transcript, or fifteen seconds at the playhead when nothing is selected, named from the words said there. I and O then set its start and end at the playhead.
- Export opens Export all clips… and Export selected…. See Batch export.
- Ctrl-click ticks a clip, and Shift-click ticks a range, for Export selected….
- Drag a row onto the Sequence to add it there, or onto the canvas to make it a layer.
Right-click a clip for the rest.
| Rename | Edit the name. F2. |
| Duplicate | A copy of the clip. Ctrl D. |
| Set range to selection | The clip becomes the words selected in the transcript. |
| Tighten silence… | Cuts the quiet gaps out of the clip. See below. |
| Add to sequence | Adds it to the end of the sequence. T. |
| Add as layer | Adds it to the composition at the playhead. L. |
| Export with template | Renders this clip through a template. |
| Set start = playhead | Moves the clip's start, or with Set end = playhead its end, to the footage playhead. I and O. |
| Drop (exclude) | Keeps the clip in the list and leaves it out of Export all clips…. Keep clip brings it back. |
| Delete clip | Removes it from the project. |
Tighten silence
Tighten silence… jump-cuts silences, and filler words if you ask, out of a clip using its word timings. Strength is Light, Standard or Strong: the stronger, the shorter the silence it cuts and the less it leaves around speech. The dialog says how many seconds come out and in how many pieces; Preview result plays the result before you Apply. The clip then has several ranges, which the open clip lists so each can be edited, played, reordered or removed. The same command on a clip layer's menu in the timeline tightens that layer.
Sequence

The sequence holds clips in order. It sets time and order only; position, size and everything drawn over the video belong to the composition. Add a clip with Add to sequence, or drag one in from Clips.
- Play. Play plays the whole sequence in the Footage viewer. Clicking a clip plays from that spot, and clicking near the end of one is the quick way to check its join with the next. The needle sweeps the strip and each clip's words light up as they are spoken.
- Trim. Drag either edge of a clip and the player shows the frame you are cutting to.
- Split. While it plays, S or Split cuts the playing clip at the needle. Right-click a clip and pick Split here to cut at that spot instead.
- Reorder and remove. Drag a clip onto another to move it there. The ✕ on a clip, or Remove from sequence, takes it out. Clear empties the strip.
- Save as clip saves the sequence as one clip with several ranges, which you can export or layer like any other.
- Render to clip, on a clip's right-click menu, bakes that clip to a new video file and adds it to the project as footage and as a clip.
The whole sequence can be one layer of the composition: Add as layer on the sequence's row in Project, or Sequence in a clip layer's clip list in Properties.
Project
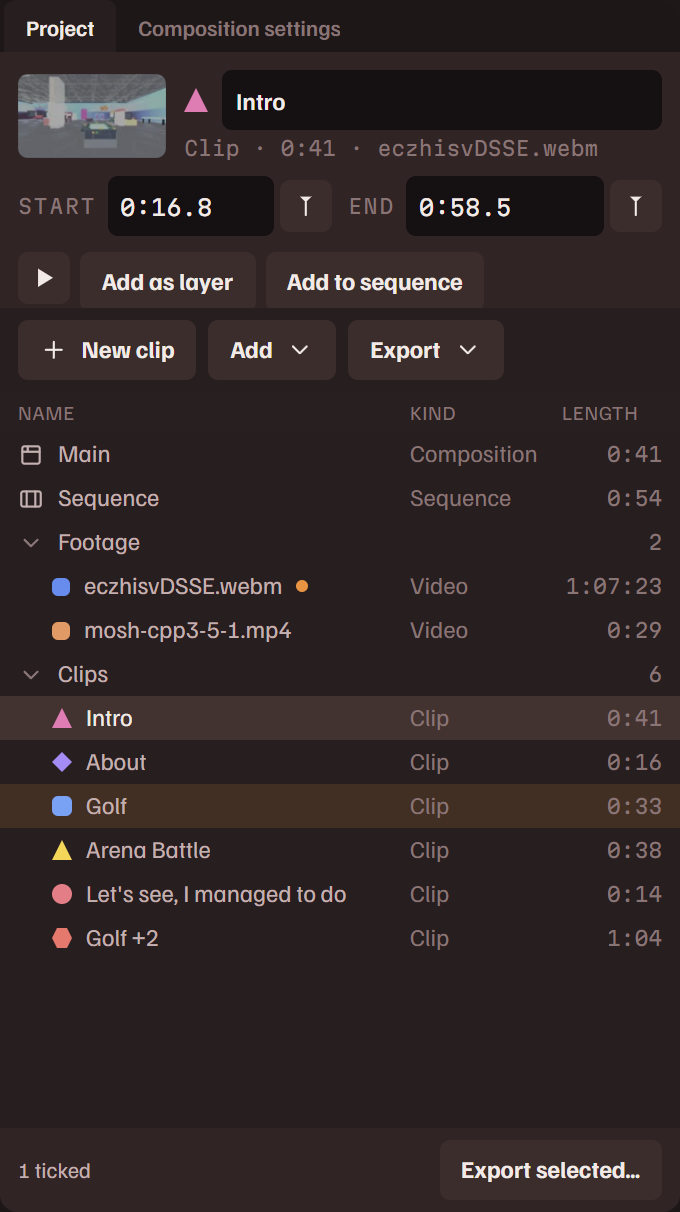
The Project panel lists everything the project is made of: the composition, the sequence, a Footage folder and a Clips folder. It is open in the Traditional layout, and in the others from Panels in the View menu.
- Select a row and the strip above the list shows it: a clip's name, Start and End (type a time, drag the value, or set it at the playhead with the button beside it, as in Clips); a footage's colour with Show in viewer; the sequence with Open; the composition with Composition settings. A selected clip is a band on the Footage viewer's marker bar.
- Click a row twice to open it: the composition and its timeline, the sequence, a footage in the viewer, or a preview of a clip.
- Drag any row but the composition onto the Timeline and it is a layer starting where you drop it. Dropped on the canvas, it is a layer at the playhead.
- Ctrl-click and Shift-click tick clips, as in Clips. New clip and Export are in the panel's bar.
Right-click a row for its commands. A clip has the menu it has in Clips. A footage has Show in viewer, Add as layer (the whole file), New colour, Make preview copy when it has none, and Open in Explorer. The sequence has Open, Add as layer and Save as clip. The composition has Composition settings and Project settings….
Composition
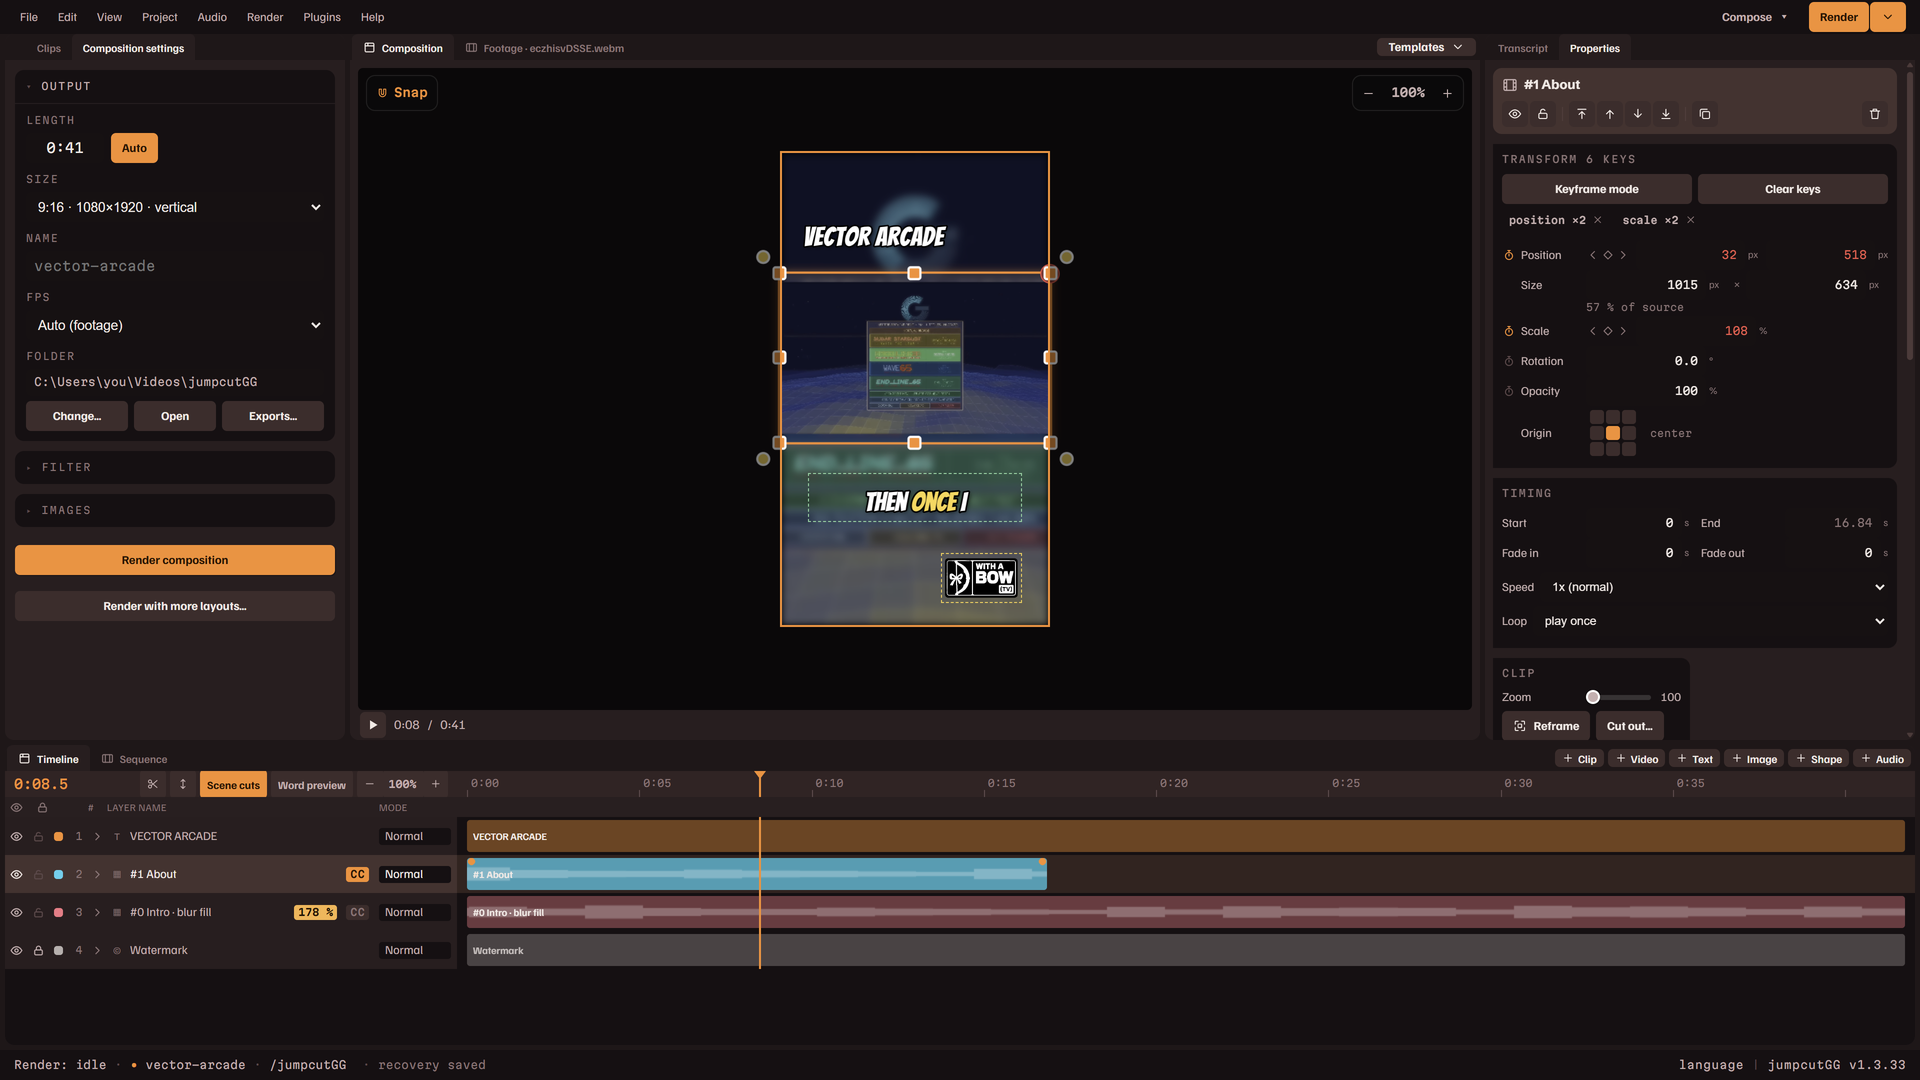
The Composition tab is the canvas: the frame of the video you render, with every layer drawn where it will be. Under it are a play button and the time. Space plays the composition while this tab is showing.
Selecting and moving
- Click a layer to select it. Click the empty canvas to select nothing. To select several, Ctrl-click or Shift-click their rows in the Timeline.
- Drag a layer to move it. Shift keeps the move to one axis. With several selected, all move; hold Alt to move only the one under the pointer.
- The arrow keys nudge the selection, further with Shift.
- Drag a handle on the edge to resize. Clips and images keep their shape; a shape's width and height are separate; a text has one handle for its size and one on its right edge for the width it wraps inside.
- Drag a corner's rotate handle to turn a layer. Shift turns in steps of 22.5°.
- Click inside a text to edit it in place.
Snap and zoom
Snap, at the canvas's top left, makes a dragged layer's edges and centre catch on the frame's edges and centre and on the other layers, with a guide line where it catches. The zoom buttons at the top right step the view; the percentage between them resets it to fit. Ctrl and the mouse wheel zoom about the pointer, from 20% to 600%.
Right-click menus
On a layer: Bring to front, Bring forward, Send backward, Send to back; Change clip and the caption switch for a clip layer; Intro animation and Outro animation; Duplicate and Delete. On the empty canvas the menu adds a layer where you clicked: a clip, a text, an image, your avatar or wordmark, a video file, or sound.
Align, arrange and layer layouts
- Align in the Edit menu lines up the selection: left, centre, right, top, middle or bottom, and Distribute horizontally or Distribute vertically for three or more. One layer aligns to the canvas. Two or more align to each other, or to the canvas with Align to canvas ticked.
- Arrange changes which layer is drawn over which.
- Layer layout rebuilds every clip layer into one arrangement: single, 2-up, 3-up, a grid, picture-in-picture, scrolling walls, columns, or a screen with a camera. It fills the arrangement from the project's clips in turn and replaces the clip layers you had; Undo brings them back.
- Cut, Copy and Paste work on layers. A pasted layer lands where the original was, and a clip's caption travels with it.
Timeline
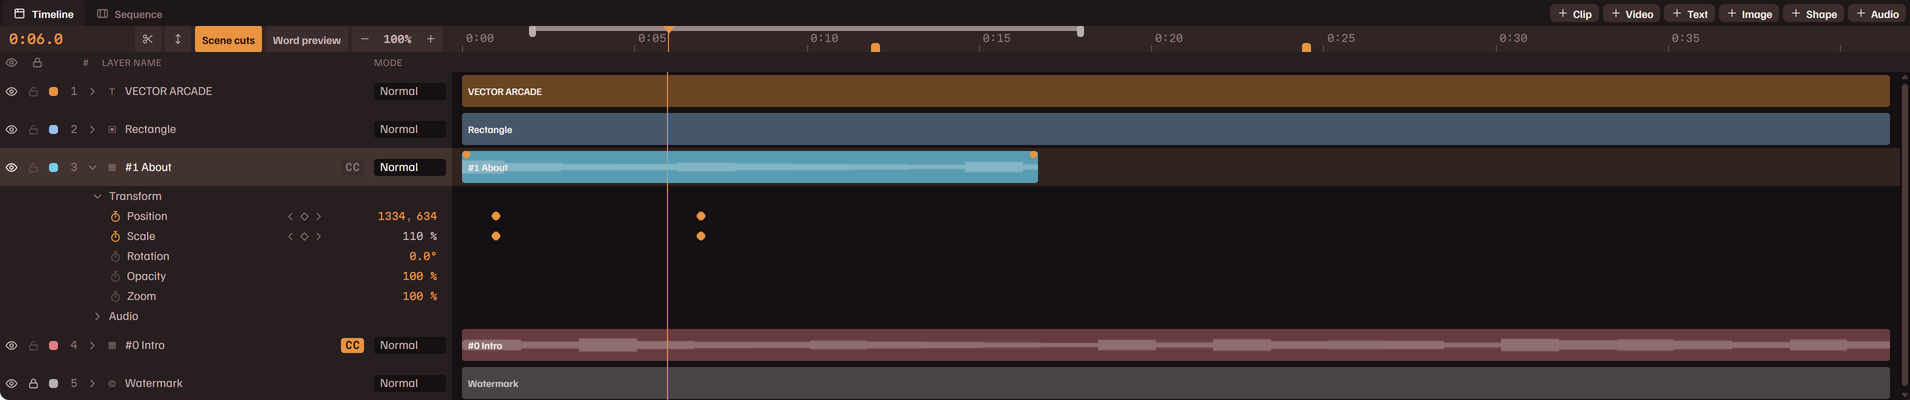
The Timeline has one row per layer, the top row drawn over the ones below. The left column names each layer; the right side is time, with a bar from where the layer starts to where it ends.
The toolbar
- The buttons at the right end of the tab strip add a layer: Clip, Video, Text, Image, Shape and Audio. See Layers.
- At the left: the time at the playhead, a scissors button that splits the selected layer at the playhead, and a button that switches the rows between slim and full height.
- Word preview writes the next few spoken words on each clip layer at the playhead. The number beside it is how many.
- The zoom buttons stretch time, each press doubling it, until about one second is across the panel, however long the composition is; the button between them says how much time is on screen and resets it to fit. Ctrl and the wheel zoom about the pointer. Shift and the wheel scroll along time. Zoom to selection (View, or Shift Z) fits the selected layers across the panel.
- Drag the grip at the edge of the left column to make the column wider.
The ruler and the playhead
Press or drag on the ruler to move the playhead. Pressing the empty part of any row does the same. Hold Shift while scrubbing and the playhead catches on the nearest layer edge. The ruler also carries the work area and the markers.
A row
- The eye hides and shows the layer. The lock stops it being changed: a locked layer's values are dimmed, and the lock pulses if you press one.
- CC, on a clip layer, turns its captions on and off.
- The Mode column is the layer's blend mode. Click it for the list.
- A percentage beside the name means the layer is enlarged past its footage's pixels and will look softer than the footage is.
- Click a row to select its layer. Ctrl-click adds or removes one; Shift-click selects a range.
- Drag a layer's name up or down to restack it. Dropped on the middle of another layer's row, the two become a group.
Bars
- Drag a bar to move the layer in time. Drag either end to trim it.
- A dragged bar catches on the start and end of the composition, the playhead, other layers' edges, markers and the work area, and a guide line shows where. Hold Alt to drag freely.
- The handle at each end of a bar sets its fade in and fade out. When the layer has an intro or outro effect, the handle sets that effect's length.
- Clip layers, audio layers and the music row draw their sound as a waveform.
- A layer that has been tightened holds several clips back to back. The thin band along its top and bottom is the layer; each rectangle is one clip, which can be dragged or trimmed alone. Drag one off the row and it becomes a layer of its own.
- With Scene cuts on in the timeline's header, a clip layer carries a tick wherever its footage has a scene cut (see the Footage marker bar), and a dragged bar, a trimmed edge, a marker and the Shift-scrubbed playhead catch on them. Split at scene cuts on the layer's menu cuts it at every one inside it, as one undo step.
- A clip layer dragged off the timeline onto Project or Clips becomes a clip of its range, named from the words said in it; the layer stays where it was. A tightened layer becomes a clip of several ranges.
A layer's properties
The arrow beside a layer's name opens its properties, in groups: Transform (Position, Scale, Rotation, Opacity, and Zoom for clips and images), Audio (Volume) and Captions.
- Drag a value sideways to change it. Shift changes it ten times as fast.
- The stopwatch gives the property a keyframe at the playhead. Clicked again, it removes every keyframe of that property and keeps the value shown.
- The three arrows after the name go to the previous keyframe, add or remove one at the playhead, and go to the next.
- Keyframes are diamonds on the row. Click one to go to it; drag it to move it in time; right-click it for its easing or Delete keyframe. See Keyframe animation.
- The Captions row has one piece per clip of the layer. Click a piece to remove or add captions for that clip alone.
Right-click menus
A clip layer's bar or row:
| Split at playhead | Cuts the layer in two at the playhead. See Timeline editing. |
| Tighten silence… | Cuts the silences out of the layer. See Tighten silence. |
| Cut out a region… | Makes a cutout of it. |
| Auto punch on beats | With a music track set, adds a zoom punch on every beat, every second or every fourth. Clear beat punches removes them. |
| Transition | How this clip takes over from the one it overlaps. See Effects and transitions. |
| Change clip | Which clip the layer plays, or the whole Sequence as one layer. Change footage, when the project has more than one, swaps the footage and keeps the same seconds. |
| Add captions for this clip | Captions for this clip alone; Remove captions for this clip when it has them. |
| Play once | With Loop (repeat) and Ping-pong: whether the layer plays once, or repeats to the end of the composition forwards or back and forth. |
| Order | Moves the layer up or down the stack. |
| Group | With Remove from group and Ungroup. See Groups. |
| Random color | A new colour for the bar. |
| Pin to start | Moves the layer to the start of the composition; Pin to end to its end. |
| Duplicate | A copy of the layer on the row above. |
| Ripple delete | Deletes it and closes the gap. See Timeline editing. |
| Delete | Deletes it and leaves the gap. |
A text, image, shape or audio layer has the split, group, order, duplicate and delete rows. A group's row has Show layers as rows or Fold into one row, Rename, Order, Ungroup, Duplicate and Delete. Right-click an empty part of the timeline for Add clip layer here.
The older timeline, with one lane per layer and no property rows, is still in the app as Lane timeline under Panels in the View menu. It is closed in every layout.
Properties
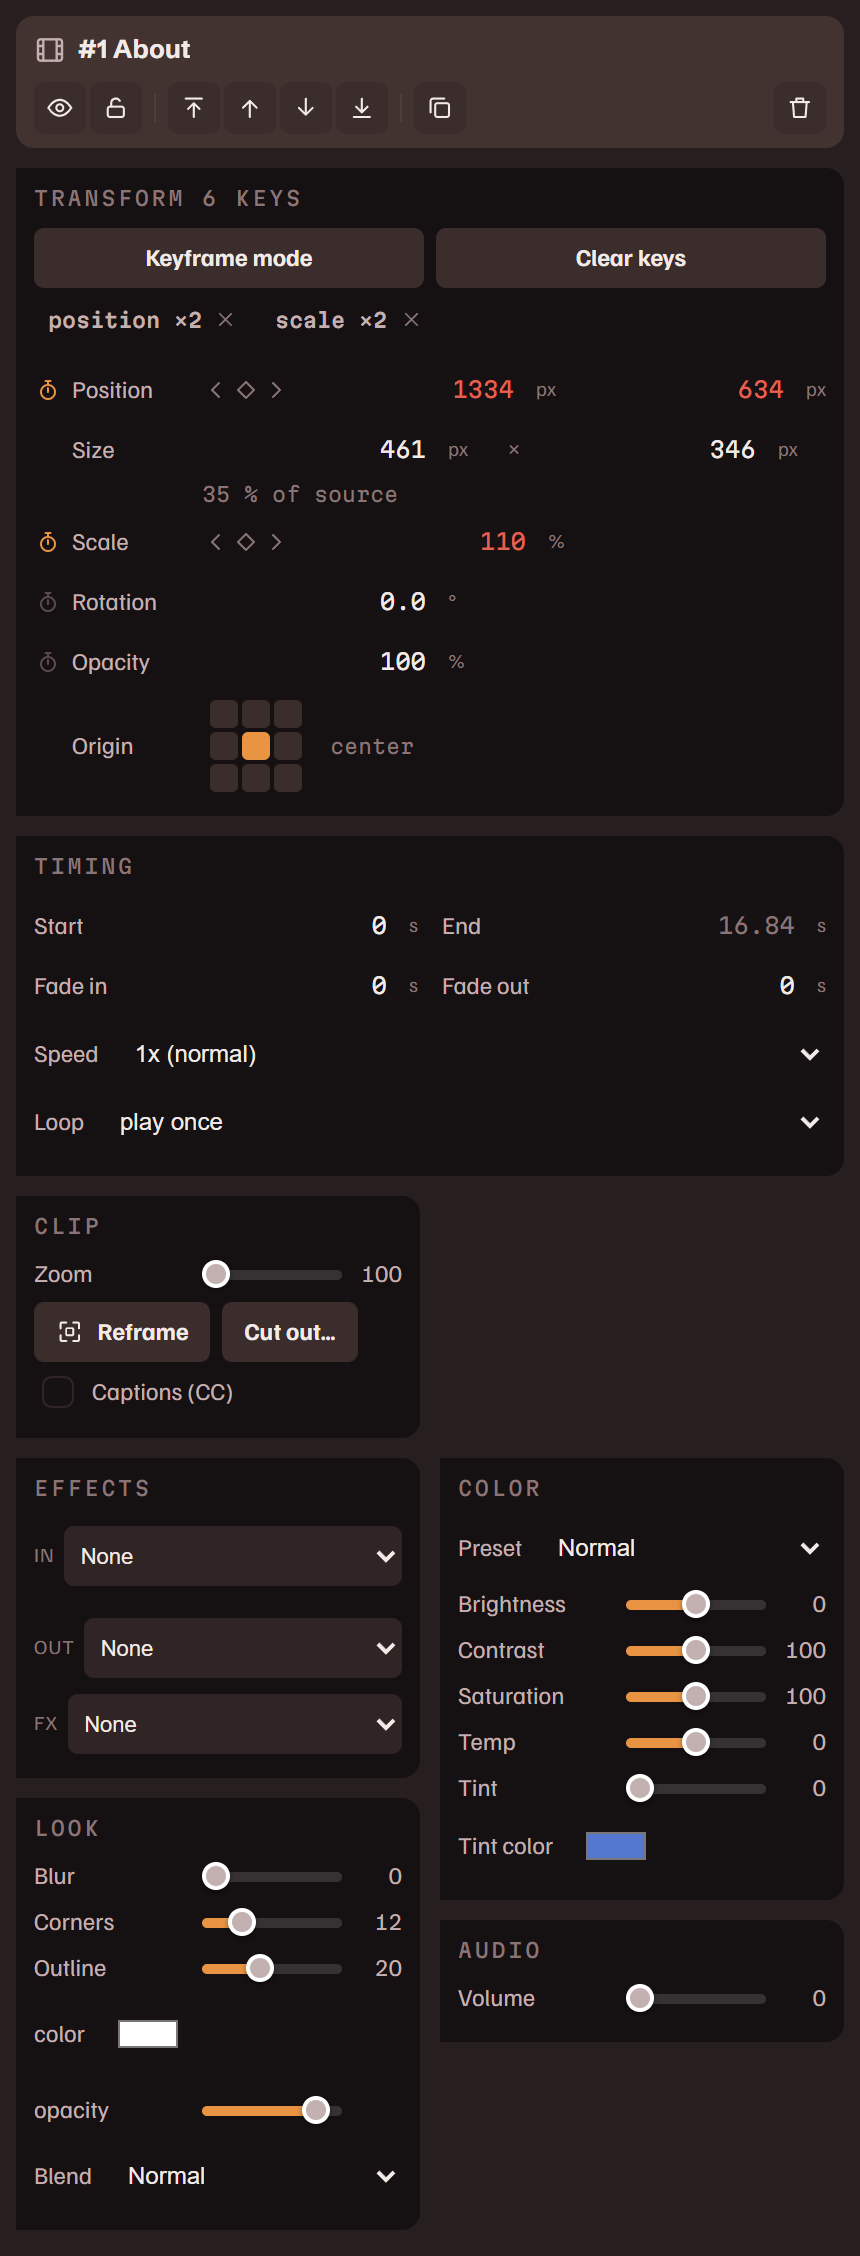
Properties shows the selected layer, in the same order for every kind of layer: a header, Transform, Timing, the layer's own settings, Effects, Look, and for a clip layer Color and Audio. The header names the layer and has buttons to hide or show it, lock it, the stacking order, Duplicate and Delete. What a clip layer plays is changed from its menu, on the canvas or on its timeline row: Change clip, and Change footage when the project has more than one.
Transform
Where the layer is and how big it is, in pixels of the composition.
| Position | X and Y: the layer's top left corner. |
| Size | Width and height. After them, a percentage: for a clip or an image it is the source scale, how many output pixels each source pixel fills as the layer is framed; over 100% it turns amber, and the picture is being enlarged. For a shape, a text or a caption it is the width as a share of the frame's. A text's size is measured and cannot be typed here: its Size is under Text. |
| Scale | The animation's multiplier over the size, as on the layer's timeline row. |
| Rotation | -180° to 180°. |
| Opacity | 0% to 100%. |
- Type a value, or drag it sideways to change it. Shift changes it ten times as fast.
- The stopwatch before a name gives the property a keyframe at the playhead. Once keyed, the value reads in lime and three arrows follow the name: the previous keyframe, add or remove one at the playhead, the next keyframe. Pressed again, the stopwatch removes every keyframe of that property and keeps the value shown.
- A value in red has keyframes while Keyframe mode is off. It cannot be changed until the mode is on, or the stopwatch removes its keys. Keyframe mode, Add key and Clear keys head the group. See Keyframe animation.
Timing
| Start | When the layer starts in the composition, in seconds. For a text, image or audio layer it moves the layer, and its end comes along. |
| End | When the layer ends. A clip layer's end comes from its clip and its speed, and cannot be typed. |
| Fade in | With Fade out: seconds of fade at each end. |
| Speed | From 0.25x to 4x. For a clip layer that holds one clip. |
| Loop | Play once, repeat, or ping-pong back and forth, to the end of the composition. Clip layers only. |
A clip layer
| Zoom | Under Clip: enlarges the footage inside the layer's frame, 100% to 400%. |
| Reframe | While on, drag the footage inside the frame to choose which part shows, and scroll to zoom. |
| Cut out… | Makes a cutout; on a cutout it reads Edit cutout…. |
| Captions (CC) | Captions this layer from its transcript. Ticked, the caption's settings appear below. See Captions. |
| In | Under Effects, with Out and FX: how the clip appears, how it leaves, and an effect that runs for its whole length. See Effects and transitions. |
| Blur | Under Look: blurs the layer. |
| Corners | Rounds the layer's corners. |
| Outline | A border round the layer: its width, colour and opacity. |
| Blend | How the layer mixes with the layers below it: Normal, Screen, Multiply, Overlay, Lighten, Darken, Soft Light, Hard Light, Difference or Exclusion. |
| Preset | Under Color, a look in one pick: Normal, Vibrant, Moody, Warm, Cool, B&W or Faded. |
| Brightness | With Contrast, Saturation, Temp (warm to the right, cool to the left) and Tint with its colour: the grade for this layer. |
| Volume | The layer's own sound, 0% to 150%. |
A text layer
Under Text: the words, a Font, the Size in pixels and as a share of the frame's height (either field sets the other), a Colour, the Width the text wraps inside (0 lets a line run as long as it likes), and the reveal row, which writes the text on a letter or a word at a time, over a number of seconds, at a rate, or in time with the music track's beat. Under Look: an Outline with its colour, a Drop shadow with its colour, distance, angle, blur and opacity, Tracking, Line height and Blend.
A text can have a background of its own: tick Background under Look for a filled rectangle behind the words. It is part of the same layer, so it moves, rotates, fades and trims with the text. Set its colour and opacity, the Padding round the text and how round its Corners are. Covers is what it fills: the text, or The whole frame wherever the text sits, which makes one text layer a title card.
Align sets how the lines sit in the text's own width: left, centred or right. With a Width they sit against that box; with none, against the longest line, so a single line looks the same in all three. It does not move the layer.
An image or a shape
Under Image: Zoom, Reframe, Brand slot, which marks it as your avatar or wordmark for templates, Replace and Remove image. Under Look: Blur, Corners and Blend. An image's height follows its picture: type its width, and the height changes with it. A shape has Colour in place of zoom, reframe and replace, and its width and height are typed apart.
Every colour swatch in Properties opens the same picker: a square and a hue bar, a hex field, the last eight colours you chose, and an eyedropper. The eyedropper puts a crosshair on the pointer and shows the colour under it; the next click anywhere in the window takes that colour, read off the screen as it is drawn, so a colour picked from the preview is the one the render makes. Esc cancels.
Sound
An audio layer has Volume and Remove audio layer. The music track has more: see Sound.
Composition settings
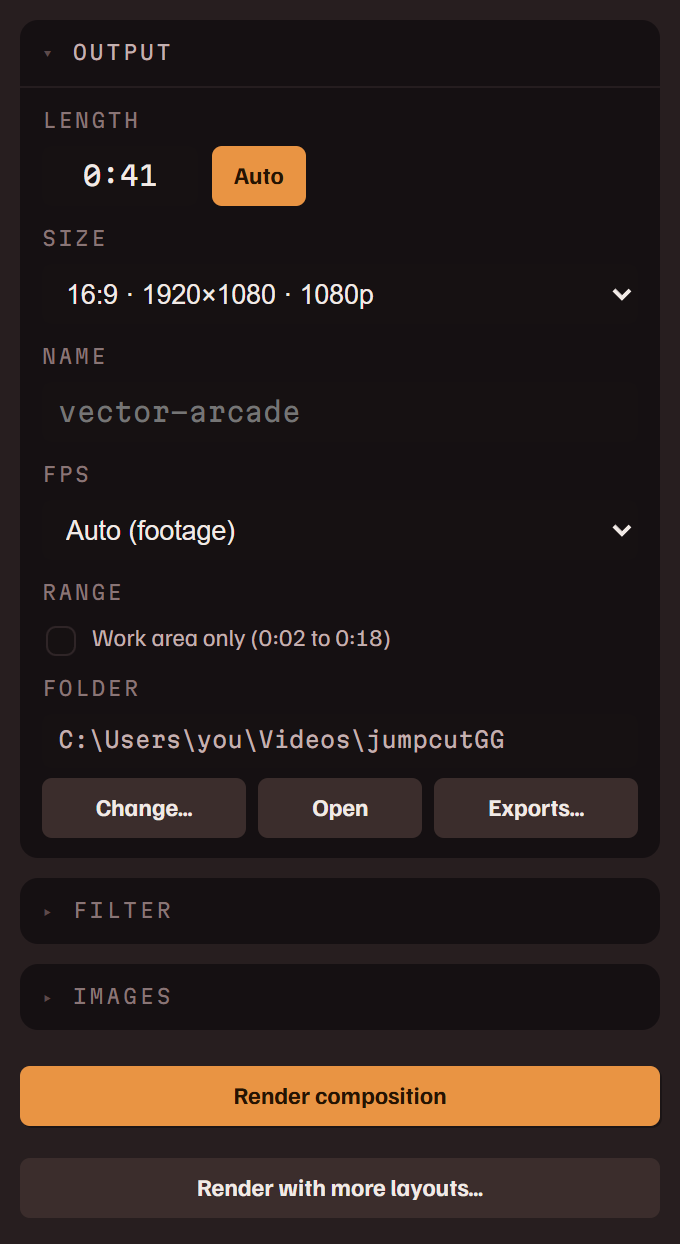
What applies to the whole composition, in three sections.
Output
| Length | The composition's length, as m:ss or seconds. Auto keeps it at the end of the last layer. |
| Size | The frame: vertical (9:16, 4:5, 3:4), square, or horizontal (16:9 at 1080p, 1440p or 4K, 4:3, 21:9). Custom… takes an exact size such as 1080x1350, or a ratio such as 2.35:1. A new project's size is chosen as it is made: on the start page, Match footage, the default, takes the footage's shape (horizontal 1920x1080, vertical 1080x1920, or square). |
| Name | The file's name. Left blank, the project's name is used. A render never overwrites a file: a name already in use gets a number added. |
| FPS | Auto (footage) uses the footage's frame rate; or 24, 30 or 60. |
| Range | Shown while a work area is set. Work area only exports that range and not the whole composition. |
| Folder | Where renders are written. Change… picks another, Open opens it, Exports… lists what is in it. |
Filter
Look grades the whole frame in one pick: Vibrant, Warm, Cool, Moody, Faded, Vintage, Golden, Noir, Lo-Fi, Cinema or Pastel, with Intensity for how much. Adjust opens the values behind it: brightness, contrast, saturation, warmth, tint, grain and fade. Vignette darkens the corners, with Amount and Feather.
Images
Background is a picture behind every layer. Watermark is a picture stamped over the video; move and resize it on the canvas. Both are for this project. The ones a new project starts with are in Settings.
At the bottom of the panel are Render composition and Render with more layouts…. See Rendering & exports.
Layers
Add a layer from the buttons at the right end of the Timeline's tab strip, or by right-clicking the empty canvas.
| Clip | A clip of the project's footage. Pick which clip it shows in Properties. Add as layer on a clip, in the transcript and in Project makes the same kind of layer. |
| Video | Any video file as a layer, whole and without a transcript. The file joins the project's footage. |
| Text | Styled text. Click inside it on the canvas to type. |
| Image | Image file… for a picture; Avatar / badge and Wordmark for your branding images; Watermark to put the project's watermark back after deleting it. |
| Shape | A Rectangle or an Ellipse of one colour. Its width and height resize separately. |
| Audio | A voiceover you record, an audio file as a layer at the playhead, or the background music track. See Sound. |
Captions are a layer of their own that belongs to a clip layer: see Captions. The music track and the background picture each have a fixed row at the bottom of the timeline.
Captions
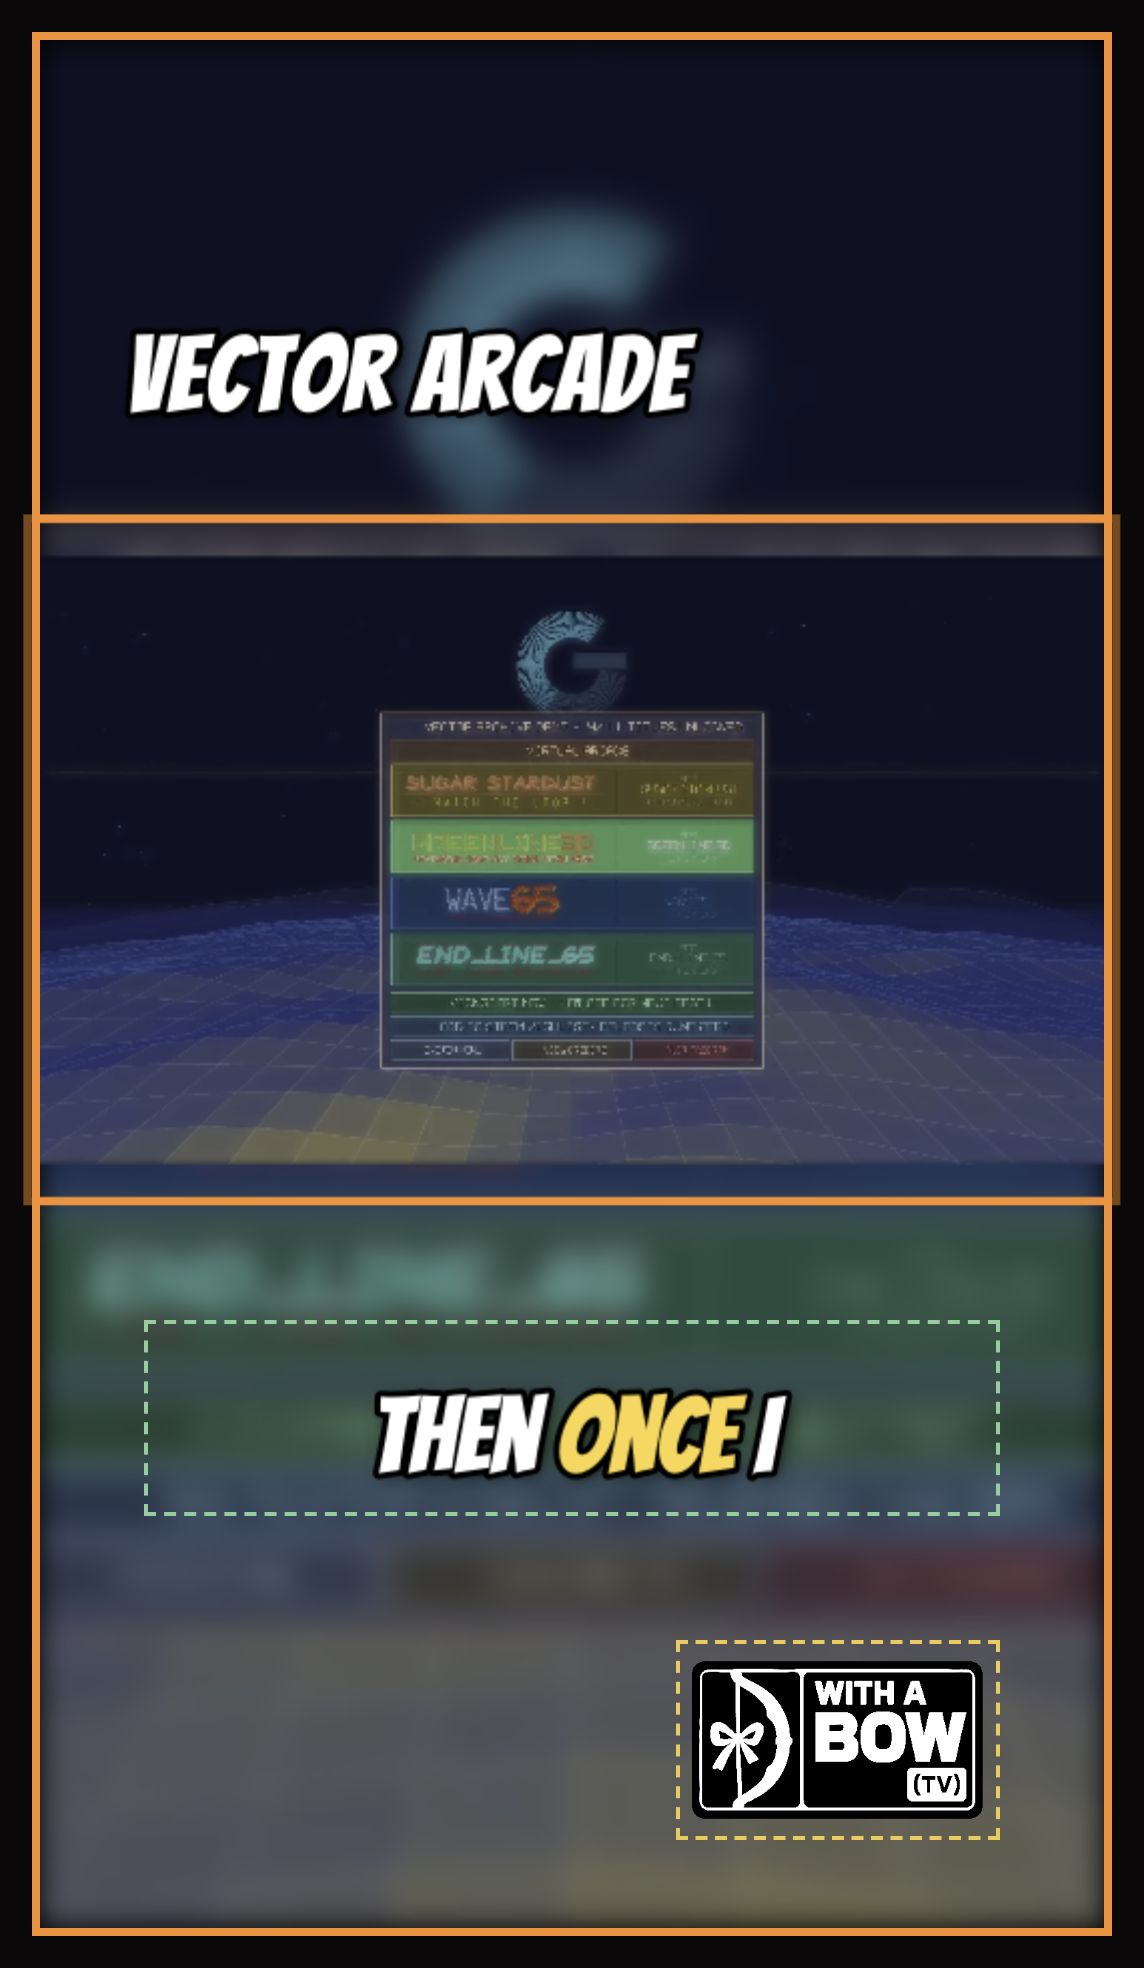
Captions come from the transcript, so there's nothing to retype. Turn on CC on a clip layer's row in the timeline, or its Captions (CC) checkbox in Properties, and a caption appears under the clip, timed to its words.
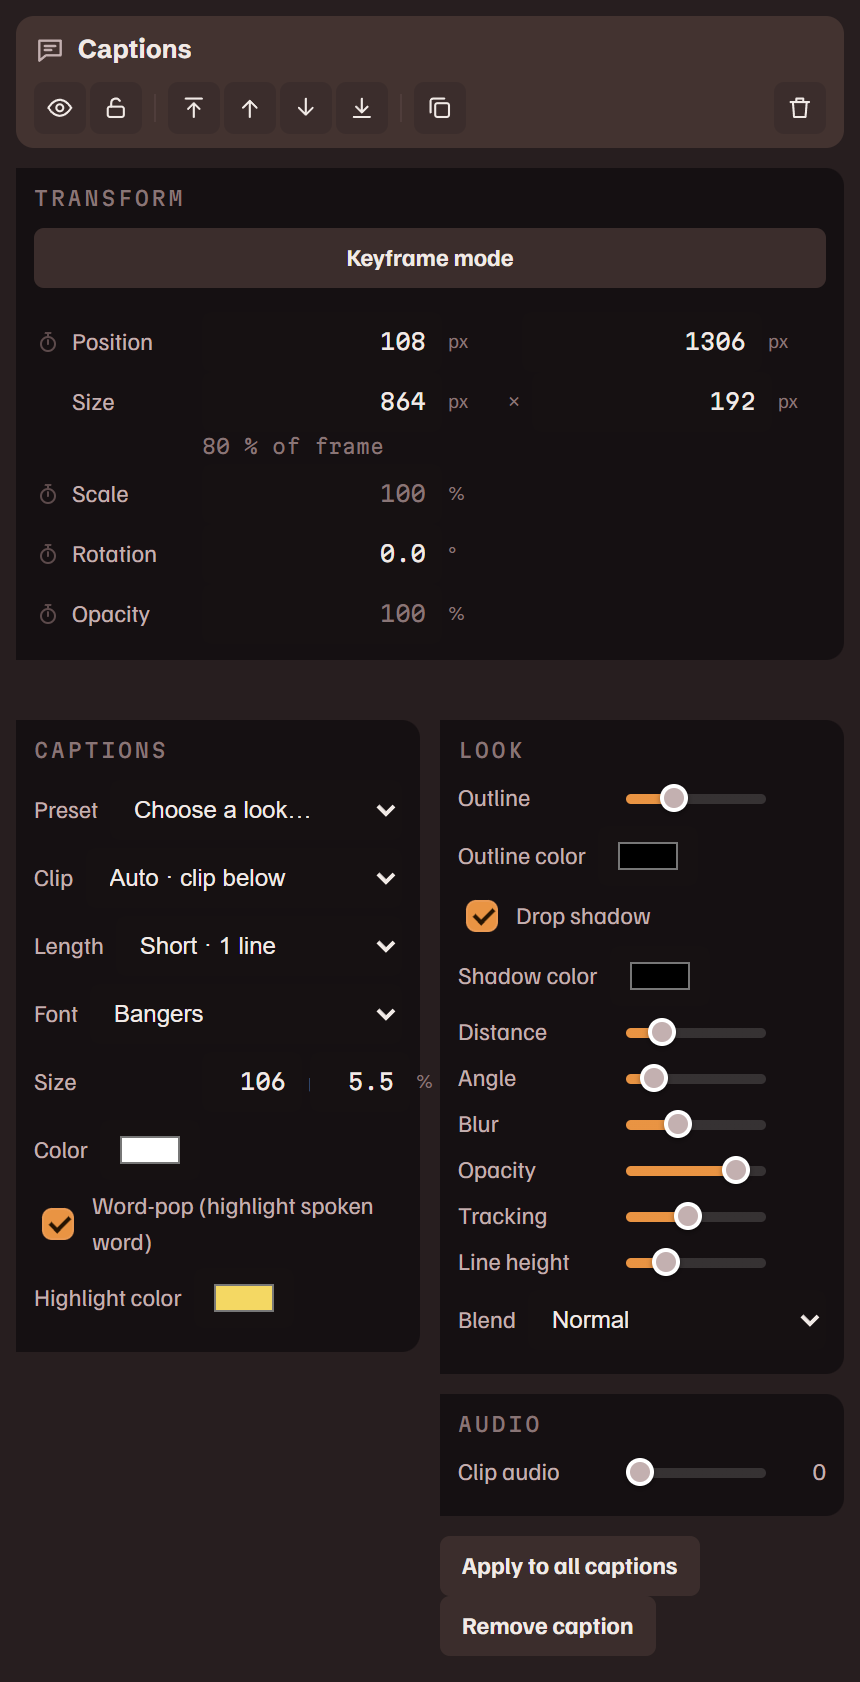
The caption is a box on the canvas. Drag it where you want it, resize it, rotate it. Its settings are in Properties, under the clip's own when the clip is selected.
| Preset | A complete look in one pick: Word Pop, Clean Outline, Minimal, Neon Karaoke or Comic Punch. It sets the style and leaves the caption where it is. |
| Length | How much is on screen at once: about one, two or three lines. |
| Size | In pixels and as a share of the frame's height, either field setting the other. With Color and Font: the text itself. |
| Word-pop | Highlights each word as it is spoken, in the Highlight color. |
| Outline | With Drop shadow and its colour, distance, angle, blur and opacity. |
| Tracking | Letter spacing; Line height is the space between lines. |
| Apply to all captions | Copies this caption's look and position to every caption in the composition. |
- A layer that holds several clips can caption some and not others: the pieces on its Captions row in the timeline, or Add captions for this clip on a clip's menu.
- Deleting a caption on the canvas turns the layer's captions off.
- The preview and the render share one caption engine, so what you see is what burns in.
If captions consistently land early or late against the audio, fix it once at the source with word timing.
Word timing
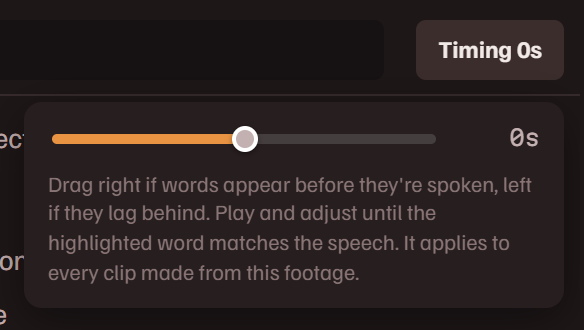
Sometimes transcription drifts against the audio causing words to highlight late or early. The Timing button in the transcript header fixes it.
- Turn on CC on the player so the caption highlight shows over the video.
- Play, and listen for a word, then pause
- Drag the slider until the highlighted word matches the speech. Drag right if words show up before they're spoken, left if they lag behind. The highlight follows the slider as you drag.
Release to save. The correction is stored with that video's transcript, and every caption, karaoke highlight and export from that video uses it.
Keyframe animation

A keyframe fixes a value at a moment; between two keyframes the value moves from one to the other. Clips can animate position, scale, rotation, opacity, zoom, reframe and volume. Images can animate the same without volume. Texts and captions can animate position, scale, rotation and opacity.
There are two ways to write keyframes, and they make the same thing.
- Select a layer and switch on Keyframe mode at the top of the Animation panel. The canvas frame is outlined while you're in it.
- Move the playhead, then adjust anything: drag the layer, resize it, move a slider. Each change writes a keyframe at the playhead.
- Move the playhead again and adjust again. Playback moves between your keyframes.
Or, in the Timeline, open the layer and click the stopwatch beside a property, move the playhead, and drag the value.
- The panel shows a chip for each animated property. Click a chip to jump between its keyframes, or its ✕ to clear that property. Add key writes one at the playhead; Clear keys removes every keyframe of the layer.
- Right-click a keyframe's diamond in the timeline for how the value leaves it: Linear, Ease In, Ease Out or Ease In-Out.
- With the mode off, an animated property shows a red ◆ and refuses edits, since playback would overwrite them. Click the red value to delete those keyframes and take manual control back.
- Origin is the point a layer scales and turns around: its centre, a corner or the middle of an edge.
- Keyframes stay with their clip: a clip dragged along its row takes the keyframes under it.
Effects and transitions
These are in the Animation panel of Properties, and need no keyframes.
- In and Out are how a clip, text or image appears and leaves: Fade, Slide Up, Slide Down, Slide Left, Slide Right, Pop / Zoom, Punch In, Spin, Slam or Flip, and Glitch or RGB Split for clips. The number beside each is its length in seconds, which the fade handles on the layer's bar also set.
- FX runs for as long as a clip or image is on screen: Glitch, RGB Split, Bob, Sway, Shake, Pulse, Wobble or Billboard, each with its own amount and speed.
- Transition, on the menu of the later of two overlapping clips in a group, is how one hands over to the other: Crossfade (dissolve), or a slide from the left, right, top or bottom. Two clips that share a frame and are moved to overlap get a crossfade by themselves.
- Auto punch on beats, on a clip layer's menu, zooms in on the beat of the music track.
Groups
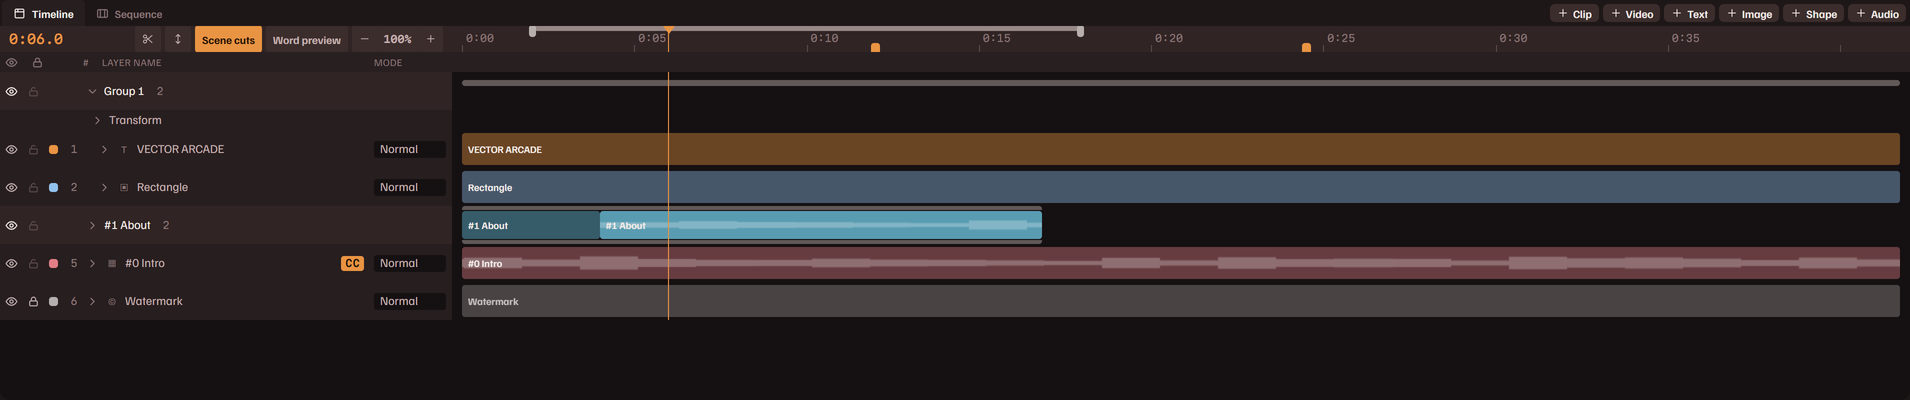
A group is one row of the timeline that holds several layers. Each member keeps its own settings and keyframes. The group adds a position and an opacity of its own on top of theirs, so a whole arrangement can move or fade as one.
- Select two or more layers and press Ctrl G, or pick Group in the Edit menu. Dropping one layer's name on another's row does the same. Ctrl Shift G or Ungroup undoes it and leaves the layers where they are.
- A folded group draws its members along one row. The arrow on the row opens it to one row per member. The band along the top and bottom of the row is the group: drag it to move every member in time.
- On a folded row, a clip that starts and ends inside another member is drawn on top of it, with a strip of that member's colour along its top. Two clips one inside the other are a stack, not a crossfade: the higher one shows, and the inner clip's own fades are how it fades in and out.
- Where a layer that fills the frame is above another, that stretch of the lower layer's bar is drawn darker, on any row. Its tooltip names the layer covering it. A layer counts as filling the frame when it is the frame's size, fully opaque, with a normal blend, no rotation, rounded corners or keyframes, and outside its fades.
- With a member selected, Properties shows the group's strip: its name, Select all, Ungroup, Group keyframe mode and Group opacity.
- With the whole group selected, a change to one member's look is made to every member of the same kind, and moving, resizing or turning one on the canvas does the same to all. Hold Alt while dragging, or with the arrow keys, to move one member alone.
- With Group keyframe mode on and the whole group selected, moving the group writes keyframes that move every layer in it.
- Remove from group, on a member's menu, takes that layer out.
Split at playhead makes a group too: the two halves are two layers on one row. And a clip layer whose clips are moved apart, overlapped or taken from different footage becomes a group of layers, one per clip.
Cutouts
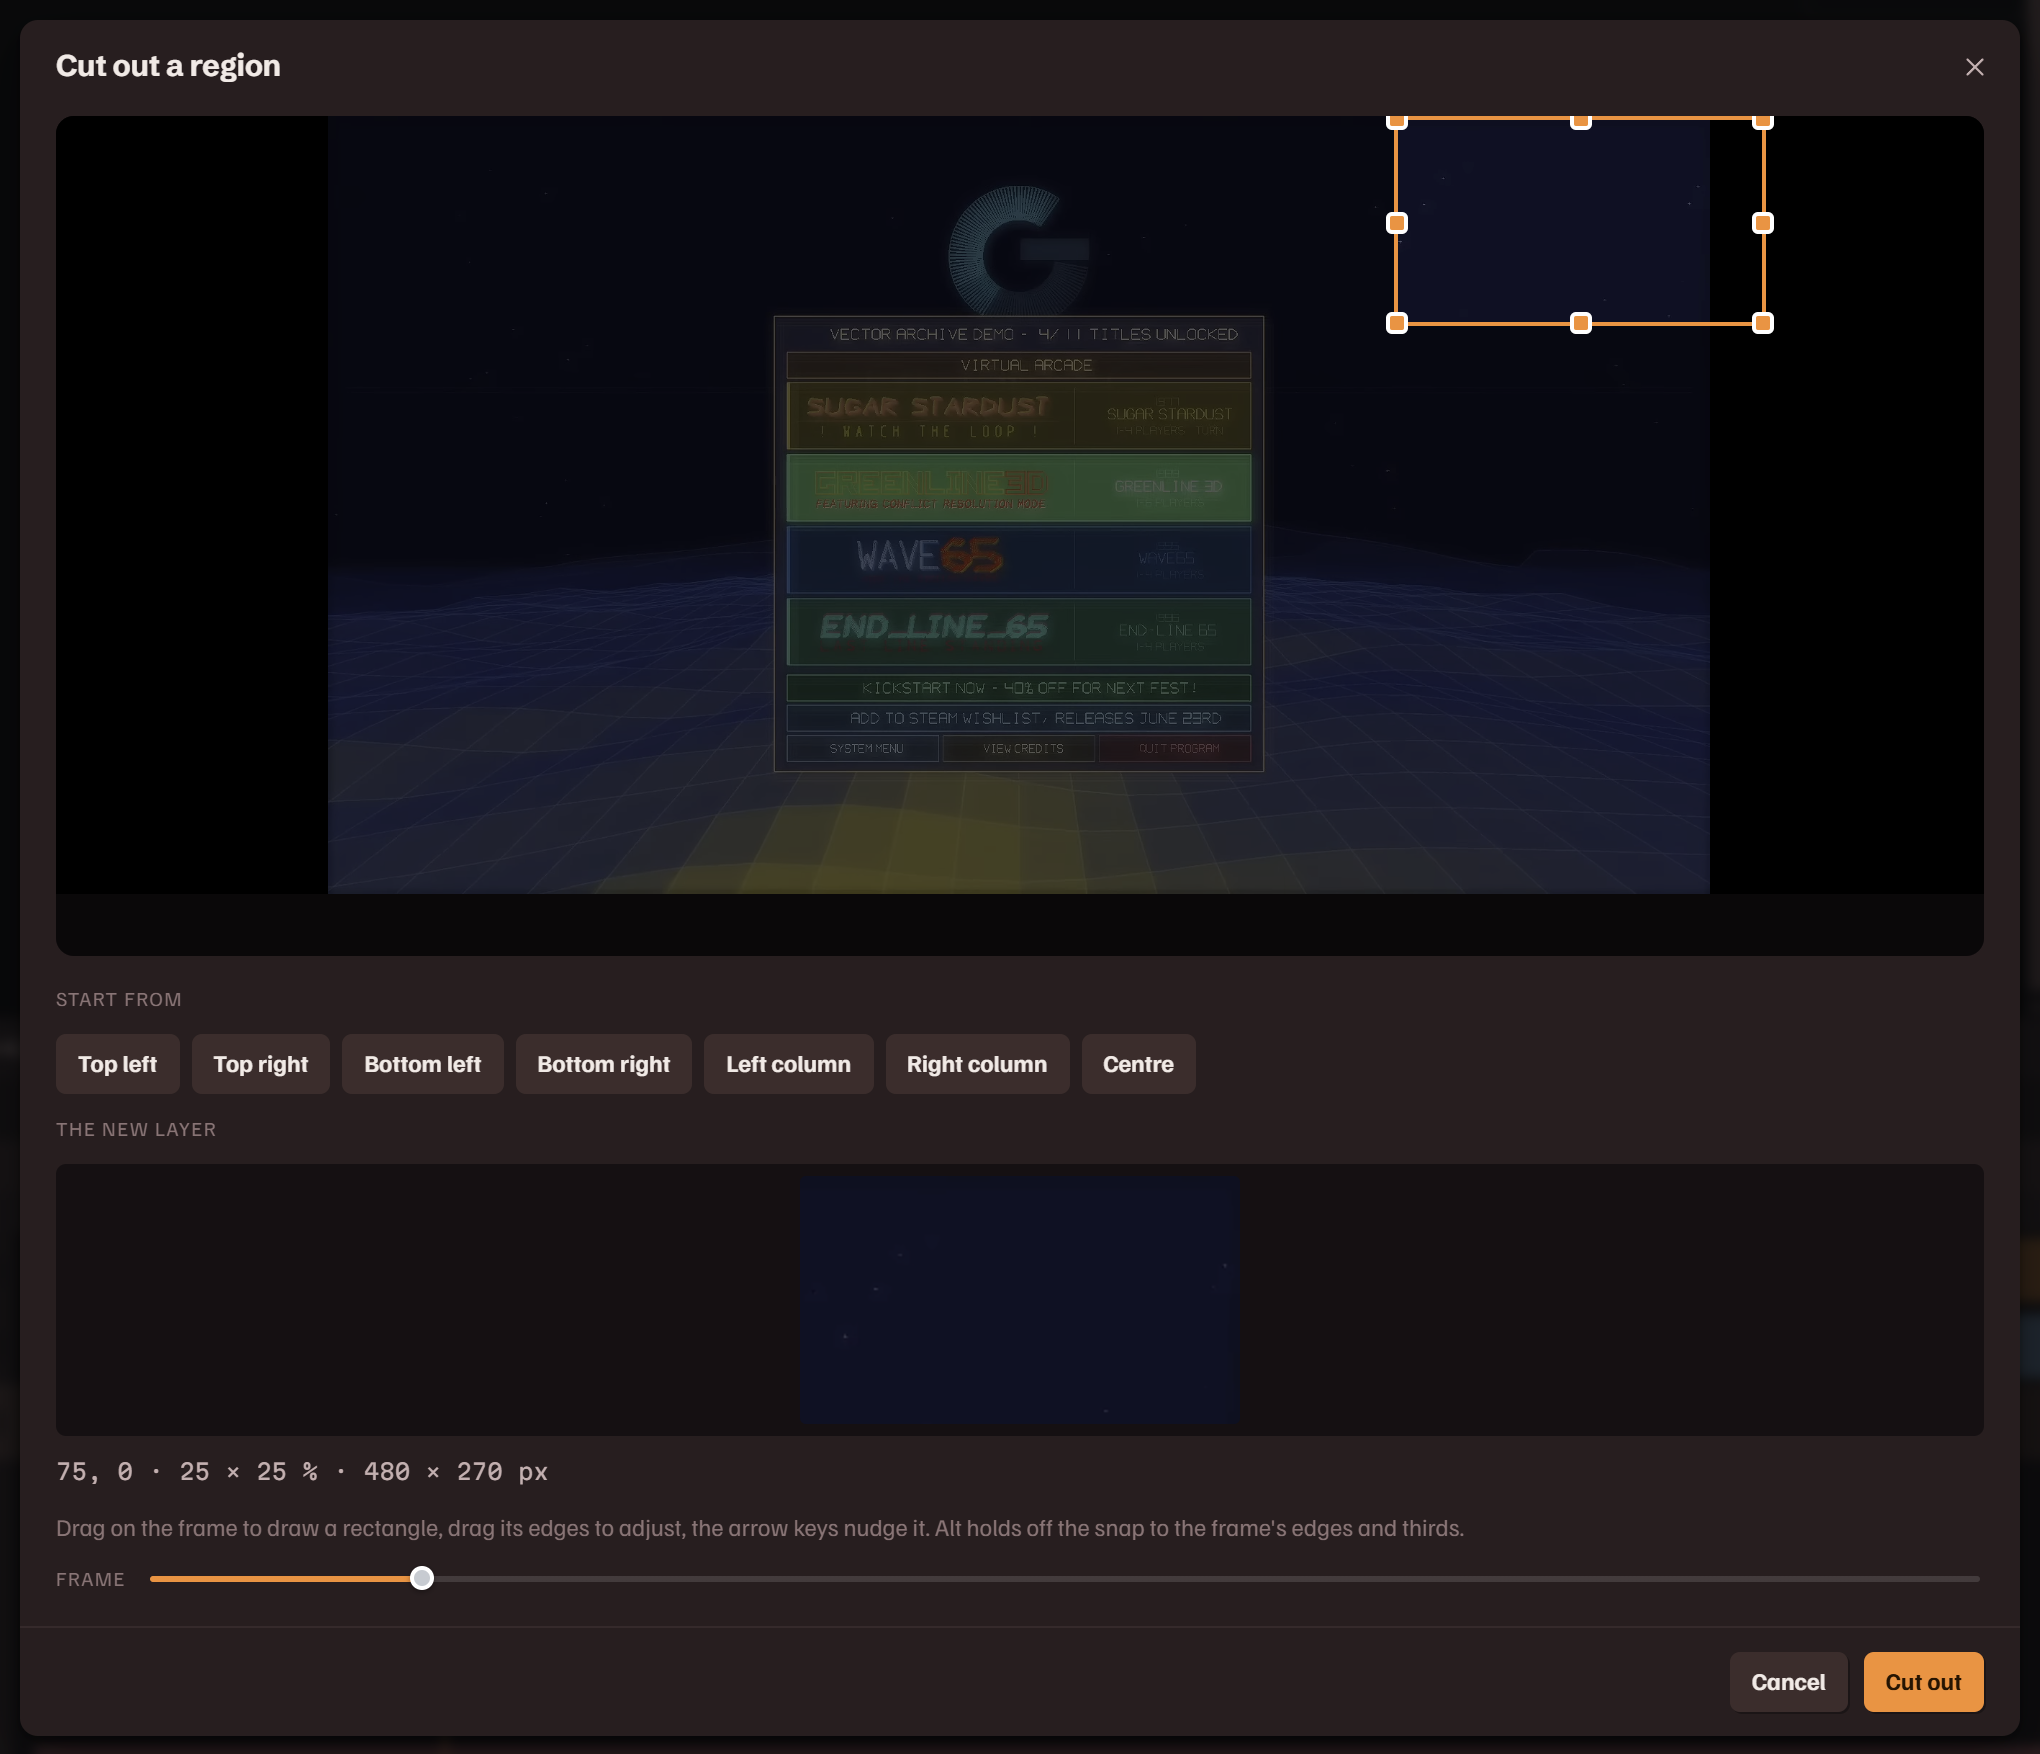
A cutout is a clip layer that shows one rectangle of its footage: the in-game chat, a minimap, a facecam in the corner of a stream.
- Right-click a clip layer and pick Cut out a region…, or press Cut out… in Properties.
- Drag on the frame to draw the rectangle, and drag its edges to adjust it. The buttons under Start from are starting rectangles: the four corners, the left and right columns and the centre. Rectangles you have used on this footage are listed after them. Frame scrubs to a moment where the region is easy to see.
- Cut out makes a new layer of the same clip at the same moment, sized to the rectangle and grouped with the original.
Zoom, reframe and keyframes then work on the cutout as on any clip. Edit the cutout… changes the rectangle later, and Clear the cutout in that dialog makes the layer show its whole frame again.
Timeline editing
Split
Split at playhead cuts the selected layer in two at the playhead. The halves are two layers kept on one row, and the later one is selected. The key is S, or Ctrl Shift D in the Traditional layout, where S shows Scale. A looping layer cannot be split until it is set to Play once.
Ripple delete
Delete leaves a hole where the layer was. Ripple delete (Shift Delete) closes it: what came after moves earlier by the length removed. For a layer in a group, the group's later members move. For one clip of a tightened layer, that layer's later clips move. For a layer alone, every later layer in the composition moves. Locked layers stay where they are.
The other way round: Push everything after the playhead… in the Edit menu moves every layer that starts at or after the playhead later by an amount you type, on every row, and the composition's markers with them. A minus sign pulls them earlier instead. A layer that crosses the point stays where it is, and a group goes whole or not at all; tick Split layers that cross this point to cut such a layer at the point and push its later half. The same row is on the ruler's right-click menu, on an empty lane's, and on a marker's, where the point is the one pointed at.
The work area
The work area is a range of the composition. Playback loops inside it, and Work area only in Composition settings exports just that range. Set it with Set work area start and Set work area end under Work area in the Edit menu, which are B and N in the Traditional layout. It is a band on the timeline's ruler: drag either end to change it, and double-click it or pick Clear work area to remove it.
Markers
M drops a marker at the playhead: on the composition when its tab is showing, on the footage when the footage is. A composition marker is a tick on the timeline's ruler. Click it to go there, drag it to move it, and right-click it for Rename… and Delete. Bars catch on markers as you drag them. Markers in the Edit menu has Add marker at playhead, Previous marker, Next marker and Clear markers.
Loops
Loop (repeat) and Ping-pong make a clip layer repeat to the end of the composition. A looping layer cannot be split or have its end trimmed.
Sound
Every clip layer plays its own sound at its Volume. The first clip layer added starts at 100% and later ones at 0%. The Audio button on the timeline, and the Audio menu, add the rest.
- Record voiceover… records from your microphone. Record and Stop make a take, Re-take replaces it, and Add at playhead puts it on the timeline as an audio layer.
- The audio file row adds a sound file as a layer at the playhead. Drag its bar to place it, trim its ends, and drag its fade handles.
- Set background music… sets one music track under the whole composition, on its own row at the bottom of the timeline. Click that row for its settings.
| Volume | The track's level, 0% to 200%. |
| Duck under speech | Dips the music whenever there is speech or voiceover and brings it back in the gaps. Duck depth is how far it dips. |
| Music only | Mutes the clips and keeps the music. |
| Replace track… | Another file; Clear track removes the music. |
Footage with no sound imports and renders like any other; there is nothing in it to transcribe.
Templates
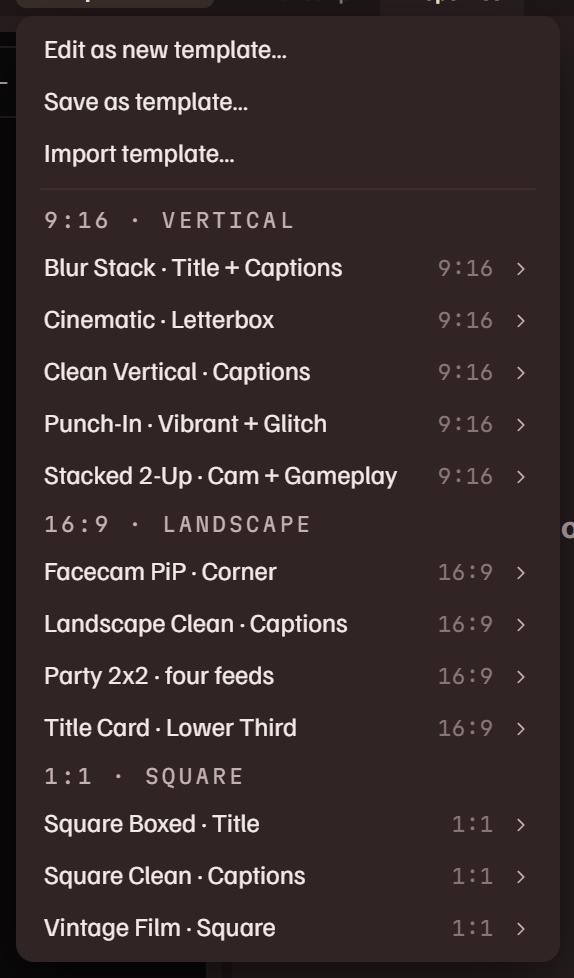
A template is a saved composition: its layers, captions, effects, look and watermark, with slots where clips go. The Templates button on the Composition tab lists them by shape. Twelve ship with the app: five vertical, four landscape and three square.
- Apply to composition asks what goes in each of the template's video slots: a layer that is on the timeline, a clip, or a footage whole, clipped or not. Each slot starts on a choice of its own (the layers on the timeline, else the clips, else the footage), so Enter applies it. The template then replaces the composition, and Undo brings the old one back.
- Quick-export. Right-click any transcript selection or clip and render it through a template without touching the canvas at all.
- Save as template… saves the composition you have. Text in it can carry
{clip},{project},{date}and{channel}, which are filled in when the template is applied or exported. - Edit… opens a template on the canvas by itself, and Edit as new template… starts an empty one. A banner over the canvas has Save template, Save a copy… and Exit, which puts your composition back exactly as it was. A built-in template is edited as a copy.
- Export… writes a template as a
.jctplfile with its images included. Import template… installs one. Delete removes one of your own.
{channel} token in template text becomes your handle at export, and an
image layer marked as a brand slot (avatar or wordmark, in the image's Properties)
fills with your image when the template is applied. Share that template and it
brands itself with the next person's settings instead.Rendering & exports
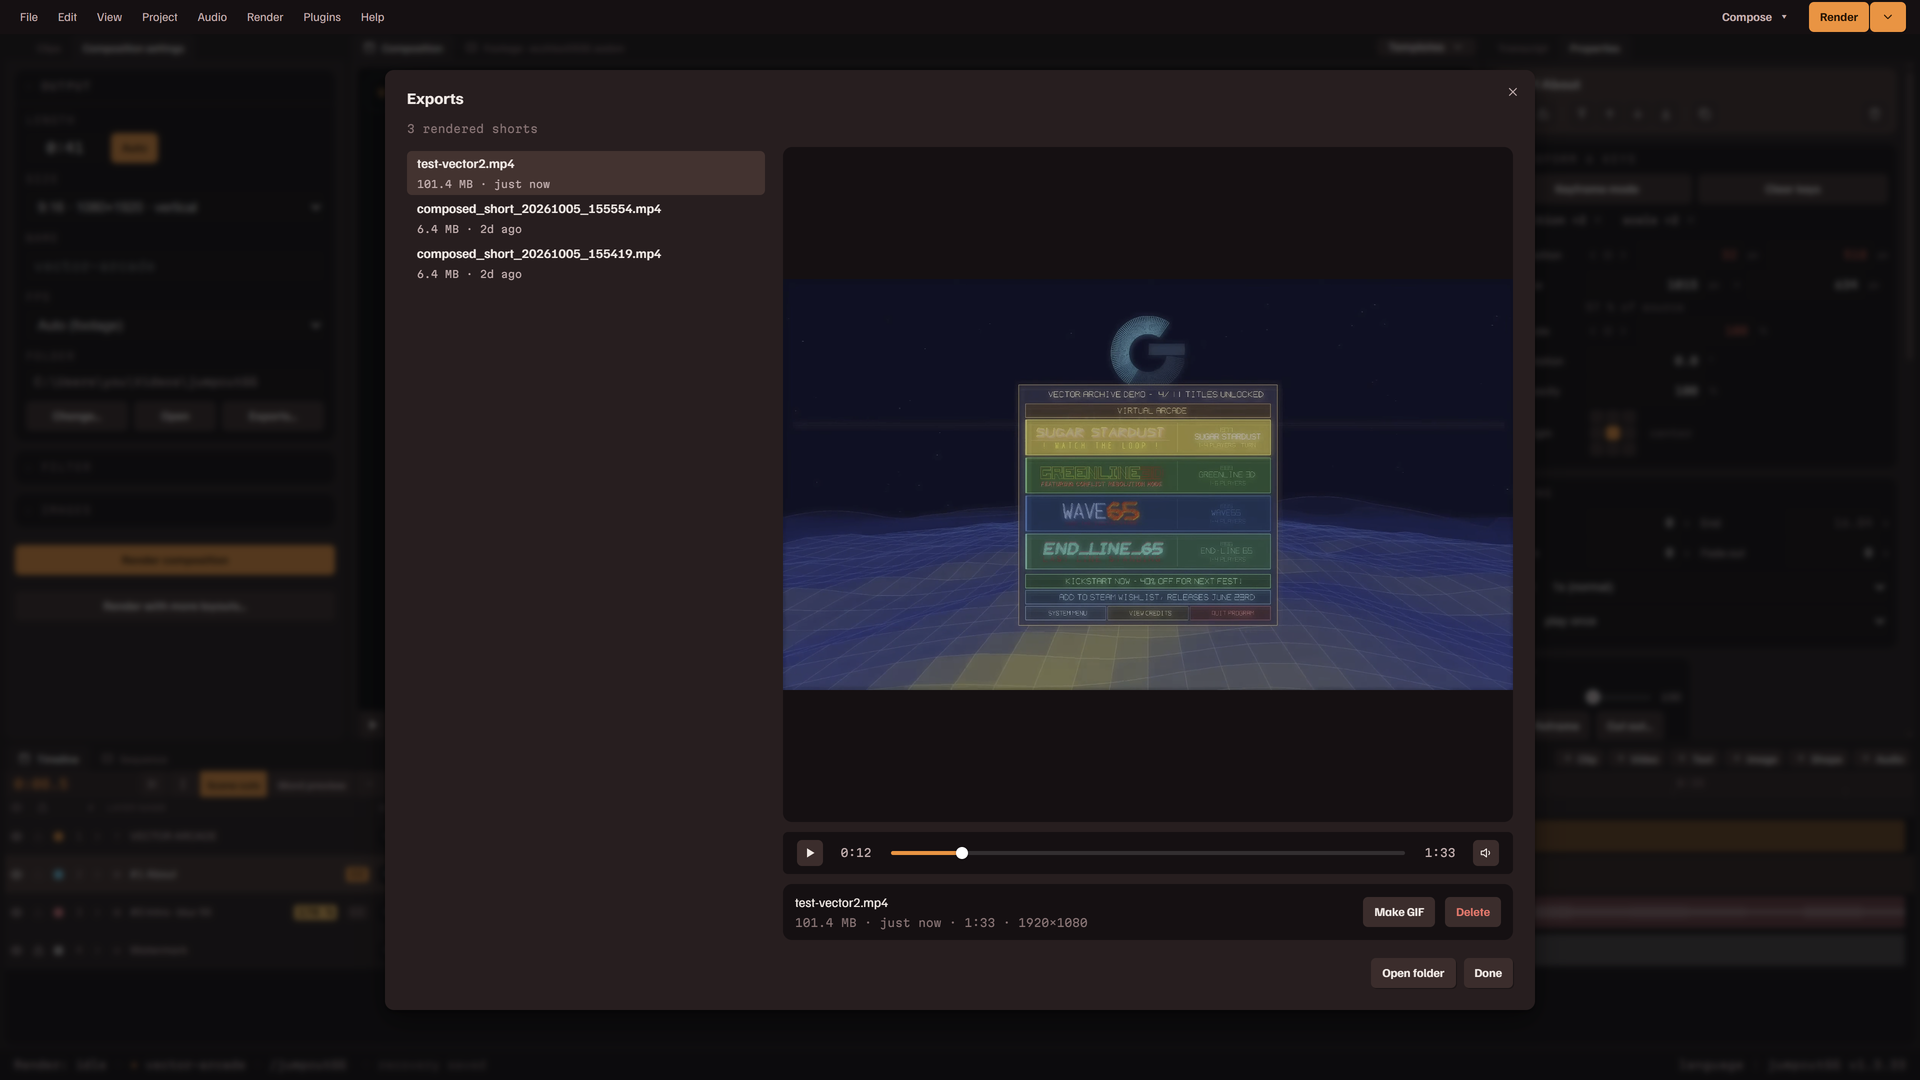
A render writes an MP4 to your output folder. There is no quality or codec to choose: the app uses your graphics card's encoder when it has one, and H.264, or HEVC or AV1 for a frame wider or taller than 4096 pixels.
Rendering the composition
- Render, at the right end of the menu bar, or Ctrl Enter, opens a first step: the file's name, filled in with the project's, and the folder it goes to. Enter renders. The dialog then names the stage it is in: preparing each layer's footage, encoding, and finalizing the file, with the time left. Cancel stops it and removes what was written.
- When it is done the dialog has Play, Open folder, Copy path and Save as GIF.
- A render encodes to a
.partfile beside the output and writes the finished file out from it at the end, in seconds for a short one and about a minute and a half for a 12 GB one. If that last step fails (a full drive, the app closed) the encoded video is kept, and the dialog offers Finalize again: the file is written out from it without rendering again. - Queue render, in the menu beside Render, renders the composition as it is now in the background while you keep editing. Queued renders run one at a time.
- Render with more layouts… queues one render for each arrangement or template you tick, with your clips put through it. The composition itself stays as it is.
Batch export
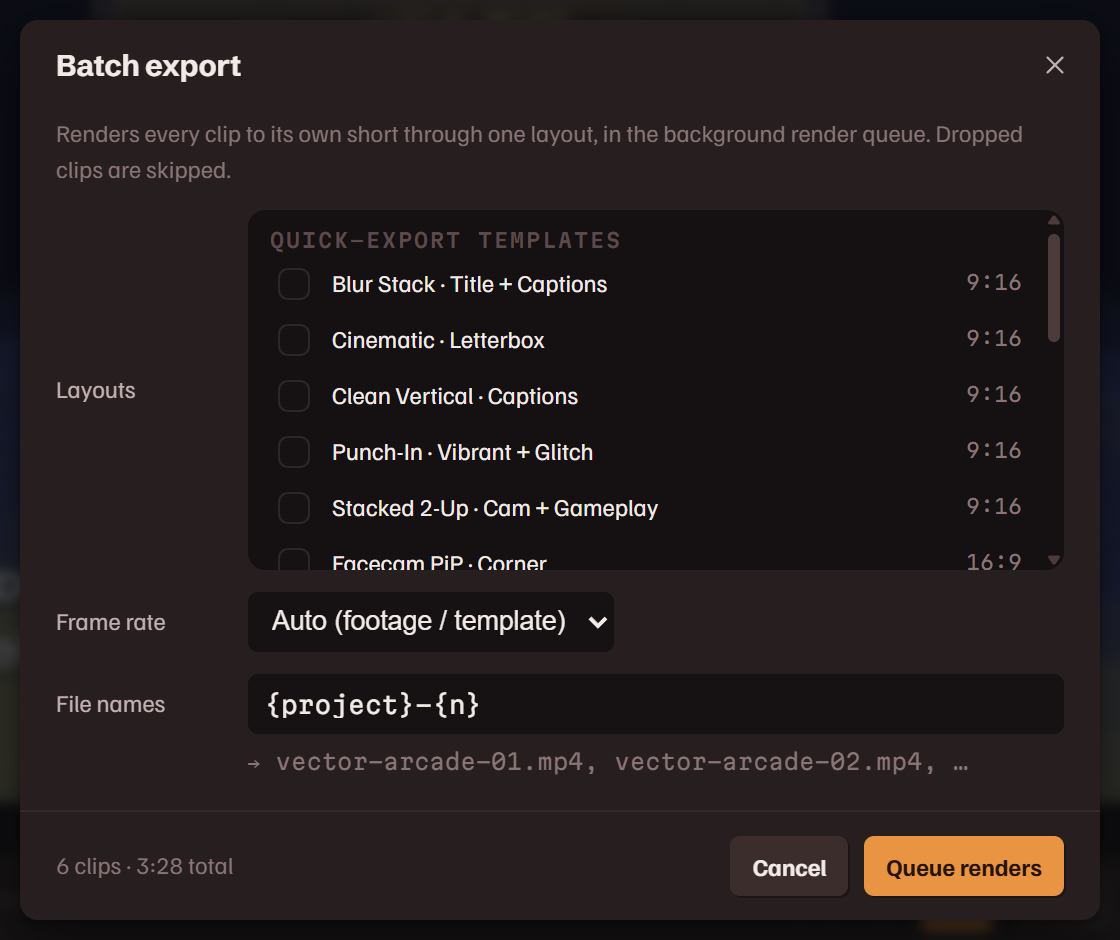
Export all clips… and Export selected… render each clip to its own file in the background. Dropped clips are skipped.
| Layouts | Tick one or more. Each clip is rendered through every ticked layout: your templates, or a plain centre crop to 9:16, 1:1, 4:5 or 16:9, or the footage at its own shape. The plain ones have no captions, text or watermark. |
| Frame rate | The footage's or the template's, or 30 or 60. |
| File names | A pattern. {project}, {n}, {title} and {date} are filled in for each clip, and the line under the field shows the names it makes. |
Exports
Exports, in the View and Render menus and behind the render state in the status bar, shows the Render queue and every video, GIF and saved frame in the output folder, newest first.
- A running render has Stop, a waiting one Cancel, and Clear finished tidies the list.
- A render that failed at its last step has Finalize again on its row: the encoded video is written out as the file, with no second render.
- Select a file to play it. Make GIF converts a video to an animated GIF beside it. Delete deletes the file from the folder.
- Open folder opens the output folder.
- Unfinished renders, above the list, are the
.partfiles a render left behind: one that died part way, or one whose last step failed. Each says how much of it plays. Finalize makes it a playable file, partial or whole; Delete removes it. Nothing is removed on its own, and the app says at start when the folder holds any.
Plugins
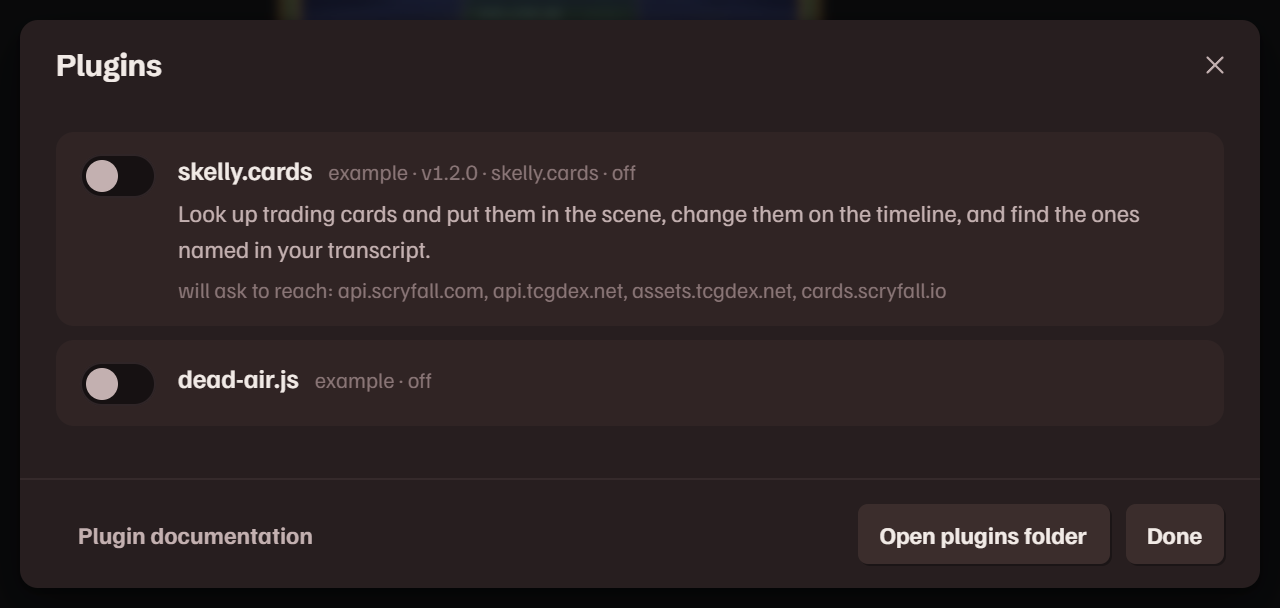
Plugins are small JavaScript files that add tools to the editor. Manage them from Manage plugins… in the Plugins menu. Every file starts disabled. An enabled plugin runs in a sandbox: it works through the app's plugin API, and it cannot read your files or reach the internet by itself. The first time one wants to fetch from a site, the app asks you, naming the site and the plugin.
- The switch beside a plugin turns it on or off at once. The line under its name says whether it loaded, and which sites it will ask to reach. A site you allowed is listed there; click it to withdraw the permission.
- The prompt's Allow lasts until the app closes unless you tick the box to remember it for that plugin.
- Open plugins folder opens the folder plugins are read from. A plugin is a
.jsfile, or a folder with amain.jsin it. - A plugin's button appears on the Composition tab, on the Footage panel or among the timeline's add buttons, and a plugin can add rows to the right-click menus and to the Plugins menu.
- A plugin's panel can be dragged by its title, docked, resized, and moved to a window of its own with Open in its own window. Return to the main window brings it back.
Three ship with the app. skelly.cards looks up trading cards (Magic: The Gathering and the PKMN trading card game) and puts them on your canvas: search by name or set number, pick the printing, and the card lands as an image layer. Its name, rules text, price and artist can come along as text you can style, and a card can change to another partway through, on the timeline. skelly.commander tracks a Commander game's life totals and counters against a recording and puts them on screen. dead air finds the quiet stretches of a recording and marks them on the ruler.
The bundled files double as worked examples for writing your own. There is a plugin reference on the site, and the same text as a README in the plugins folder.
The menus
Every command is in the menu bar. A row is greyed when it has nothing to act on.
File
| New project… | Starts a new project around a video. With unsaved work open, it asks first. |
| Open project… | Opens a project file. |
| Recent projects | The last eight, with the open one ticked. |
| Save | Writes the project to its file. The first time, it asks where. |
| Save as… | Writes it to a new file. |
| Close project | Returns to the start page, offering to save first. |
| Quit | Closes the app, offering to save first. |
Edit
| Undo | With Redo: steps back and forward through your changes. |
| Cut | With Copy and Paste: the selected layers. With words selected in the transcript, they copy the words. |
| Duplicate | The selected layer, or the open clip when no layer is selected. |
| Delete | Deletes the selection. Ripple delete also closes the gap. |
| Align | Lines up or spaces out the selected layers on the canvas. |
| Markers | Adds, steps between and clears the composition's markers. |
| Work area | Sets and clears the range playback loops in. |
| Group | With Ungroup: makes the selected layers one row, or separates them. |
| Split at playhead | Cuts the selected layer, or the playing clip of the sequence. |
| Tighten silence… | For the open clip. |
| Search the transcript | Puts the cursor in the transcript's search field. |
| Arrange | Moves the selected layer up or down the stack. |
| Layer layout | Rebuilds the clip layers into one arrangement. |
| Settings… | Opens Settings. |
View
| Panel layout | The four layouts and the ones you saved, with Save layout…, Delete a saved layout and Reset layout. |
| Panels | Every panel, ticked while open. |
| Exports | The render queue and the finished files. |
Project
| Add footage… | Imports another video into this project. |
| Make preview copy | Listed when the footage in the viewer has no preview copy. |
| Project settings… | The project's name, its file, and its background, watermark and wordmark. |
Audio
| Transcription audio… | Transcribes the footage again from another track or recording. |
| Record voiceover… | Records a voiceover as an audio layer. |
| Set background music… | Sets, replaces or clears the music track. The row above it adds an audio file as a layer. |
Render
| Render composition | Opens the render's first step: the file's name and its folder. Enter renders. |
| Queue render | Renders in the background. |
| Export all clips… | Opens the batch export for every clip. |
| Open exports… | Opens Exports. |
| Open output folder | Opens the folder renders are written to. |
Plugins
Any commands your plugins add, then Manage plugins… and Open plugins folder.
Help
| Guide | This guide, inside the app or in a window of its own, and the guided tours. |
| Keyboard shortcuts | The keys of the layout you are in. |
| About jumpcut.GG | The version, and Copy diagnostics for a bug report. |
Shortcuts
Press ? in the app for the keys of the layout you are in. A key does nothing while you are typing in a field, apart from the file commands and Ctrl F.
Playback and getting around
| Space | play / pause |
| ← → | with nothing selected, step one frame; with Shift, one second |
| , . | previous / next cut or marker in the footage |
| M | drop a marker at the playhead |
| Ctrl F | search the transcript |
Clips
| C | new clip from the selected words, or fifteen seconds at the playhead |
| T | add the open clip to the sequence |
| L | add the open clip to the composition as a layer |
| F2 | rename the open clip |
| I O | set the open clip's start / end at the playhead; with no clip open, a new clip from or up to the playhead |
| Shift I Shift O | go to the open clip's start / end |
Layers
| ← ↑ → ↓ | nudge the selected layers; further with Shift; with Alt, one layer alone |
| S | split at the playhead |
| Ctrl X | cut |
| Ctrl C | copy |
| Ctrl V | paste |
| Ctrl D | duplicate |
| Delete | delete the selection |
| Shift Delete | ripple delete |
| Ctrl G | group |
| Ctrl Shift G | ungroup |
The project
| Ctrl Z | undo |
| Ctrl Shift Z | redo; Ctrl Y does the same |
| Ctrl S | save the project file |
| Ctrl Shift S | save as |
| Ctrl N | new project |
| Ctrl O | open a project |
| Ctrl Enter | render the composition |
| Ctrl Q | quit |
| Esc | close menus and dialogs |
Mouse
| Ctrl wheel | zoom the canvas or the timeline about the pointer |
| Shift wheel | scroll the timeline along time |
| Shift drag | on the canvas, keep a move to one axis or turn in steps; on a timeline value, change it ten times as fast |
| Alt drag | on the canvas, move one layer and leave the rest of its group; in the timeline, drag without catching on edges |
| Ctrl click | add a row to the selection, or tick a clip |
| Shift click | select a range of rows, or tick a range of clips |
| middle click | on a tab, close its panel |
The Traditional layout's keys
This layout has keys of its own. ? lists all of them in the app.
Everything above works here except S as split and T as add to sequence, which are taken by the property keys.
| P S R T | show only position, scale, rotation or opacity |
| U | show every property that has keyframes |
| J K | previous / next keyframe |
| PageUp PageDown | back / forward one frame in the composition; ten with Shift |
| [ ] | move the layer so it starts / ends at the playhead; with Alt, trim it there |
| B N | start / end the work area at the playhead |
| Ctrl Shift D | split the layer in two |
| Ctrl K | project settings |
| Ctrl M | queue a render |
Settings
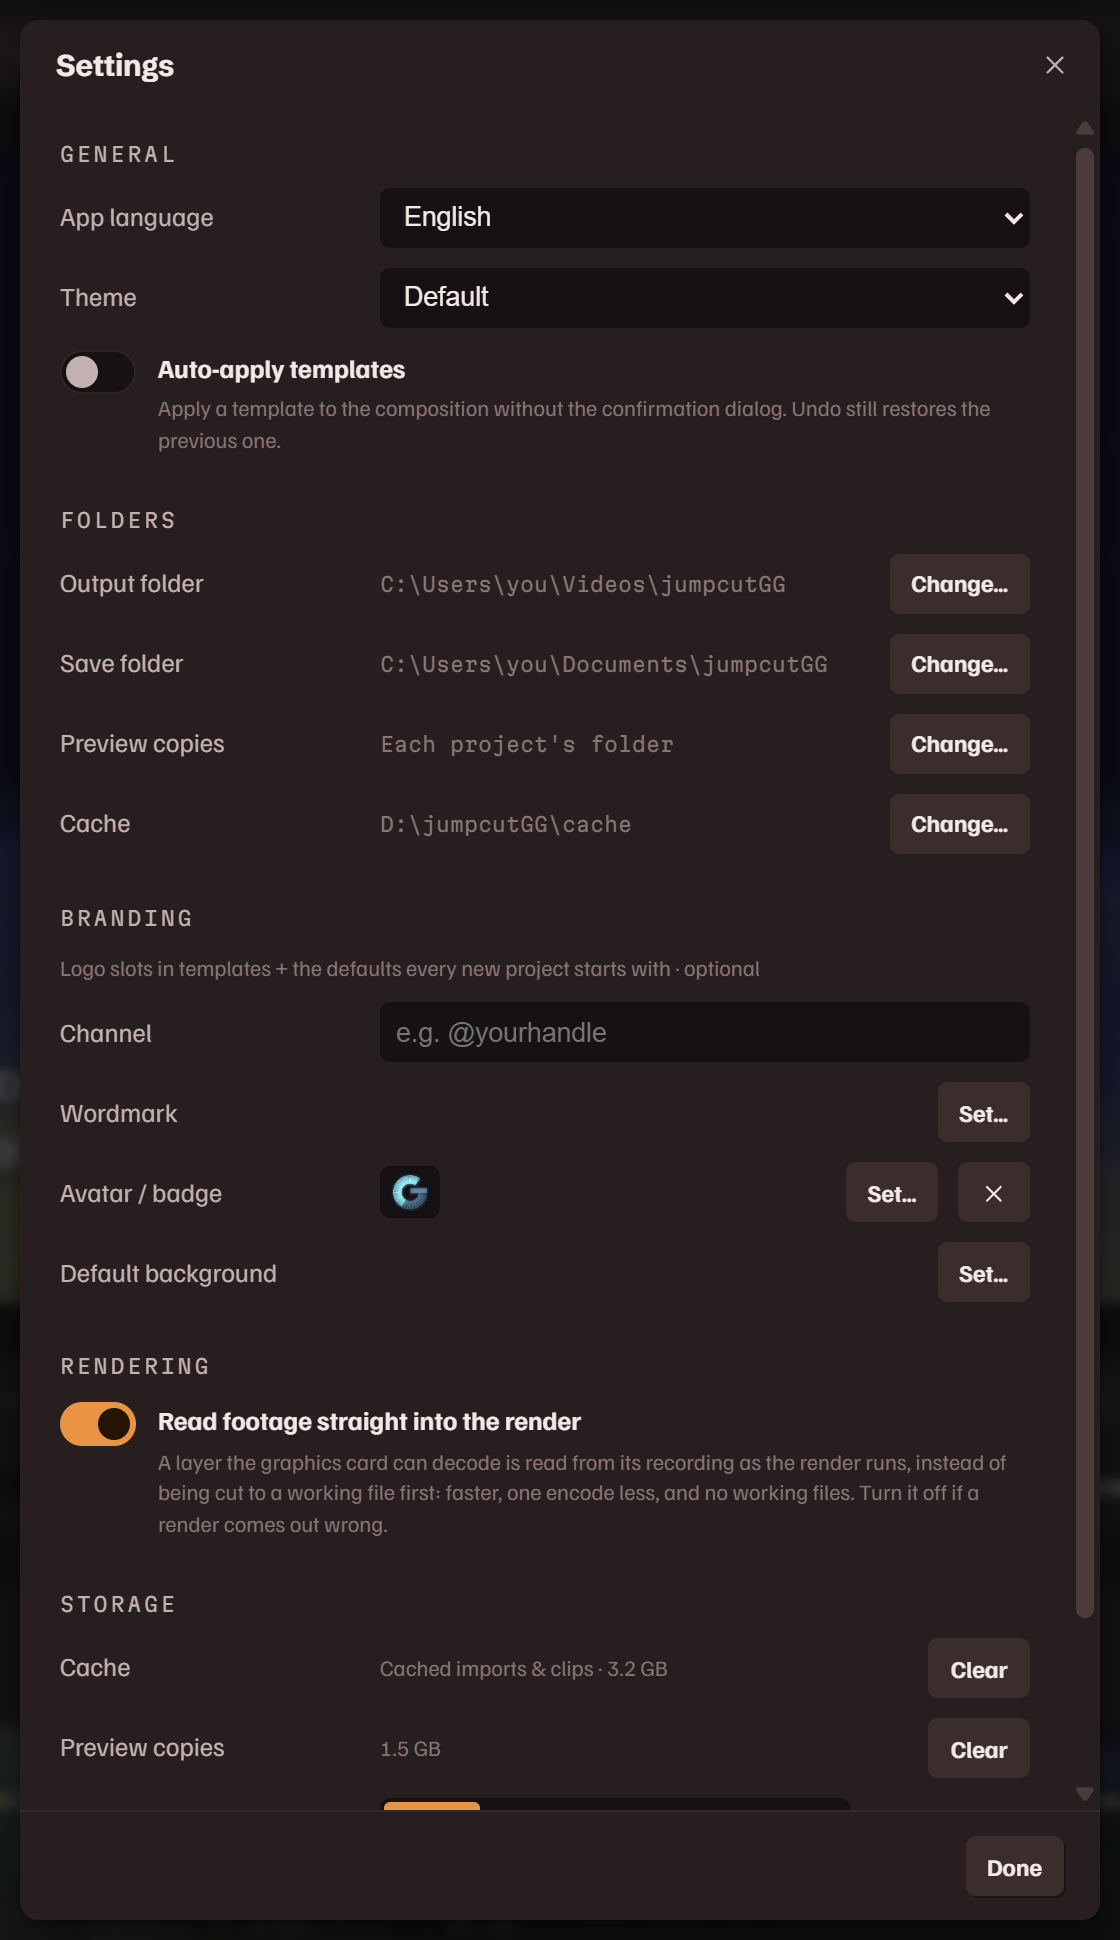
Settings… is in the Edit menu. These apply to the app on this machine, not to one project.
General
| App language | The language of the app's labels and messages, from eighteen. It applies when the app reloads. |
| Theme | Default, Light or Dark. |
Folders
| Output folder | Where renders are written. |
| Save folder | Where project files are saved. |
| Preview copies | Where preview copies are kept. Unset, each is kept in its project's folder. |
| Cache | Where imported videos, transcripts and a render's work files are kept. Pick a drive with room. Changing it moves nothing: what is already imported stays where it is. |
Branding
| Channel | Your channel name or handle. It fills {channel} in template text. |
| Wordmark | Your logo. It fills templates' wordmark slots, and every new project starts with it as its watermark. |
| Avatar / badge | It fills templates' avatar slots. |
| Default background | The background picture every new project starts with. |
Rendering
| Read footage straight into the render | On, a layer the graphics card can decode is read from its recording as the render runs, instead of being cut to a working file first: faster, one encode less, and no working files. The rest of the layers are cut as before. Turn it off if a render comes out wrong, and render again. |
Storage
| Cache | The size of everything imported, with Clear. Your project files stay; their footage has to be imported again. |
| Preview copies | Their size, with Clear. A project that needs one makes it again when it is next opened. |
| Downloader | The part that fetches video from a link. Sites change how they serve video, and Update replaces it without reinstalling the app. Use bundled goes back to the one that shipped. |
Project settings
Project settings…, in the Project menu, is for the open project: its Name, where its file is, and its own Background, Watermark and Wordmark.
Files & questions
Project files
A project saves as a .jcgg file wherever you put it. Each save keeps the previous version
beside it as a .bak. The file holds your edits and points at the footage; the footage itself
stays in the cache. Open a project on a machine that does not have its footage, or after clearing the
cache, and the app offers to import it again.
The app also keeps a recovery copy of the open project by itself, a moment after each change. It is what Resume project on the start page opens.
Where do my videos go?
To your output folder, shown under Folder in Composition settings and in the status bar. Exports lists what is in it.
Does it need the internet?
Only to fetch a video from a link, to update the downloader, or when a plugin looks something up. Transcription, editing and rendering are fully local. The web version fetches the page itself, and the speech model the first time it transcribes.
The web version
jumpcut.gg/app is this editor as a web page, free to use, in Chrome or Edge on a computer, in a window of its own. It is the same app: the footage is read from your disk where it is, and the transcription and the render run in the browser, on your graphics card where it can.
What differs: a video is picked from your disk, with no link import. A reopened project asks for its footage again
when the browser no longer has it. Save as writes the .jcgg where you choose, and a render goes into an
output folder you pick once. The first transcription downloads the speech model, about 390 MB, which the browser
keeps.
The web version makes no preview copy. When you pick an AV1 or HEVC file, the import card tries it first and says either how long a jump in it took, or that this browser cannot show its video. The desktop version makes a preview copy for either.
Renders made there carry a small "Made with jumpcut.GG" credit, which you can drag out of the way in the composition. Sign in with Steam on the start page, with the account that owns jumpcutGG, and they do not.
The picture is black, or scrubbing is slow
The footage is in a format the viewer plays badly. Pick Make preview copy in the Project menu.
A layer looks soft
It is enlarged past its footage's pixels. Source scale in Properties says by how much.
A link will not download
Press Update beside Downloader in Settings, restart the app, and try the link again.
My captions are mistimed
See word timing for the once-per-video fix. A single wrong word is fixable too: double-click it in the transcript and type the correction.
Bugs and feature requests
Each has a Steam forum: bug reports and feature requests.